Cloning a CRISPR library
By restriction digestion & ligation (i.e. the old fashioned way).
So ya want to clone a CRISPR library, huh? Here’s an overview of a legacy method with tips & tricks I’ve picked up along the way, hopefully they can save you some time and energy.
Alternatively, there’s Gibson assembly or CPEC (both newer, faster, easier) but I’ll cover them separately. To note, Gibson assembly of spacers into plasmid w/ sgRNA scaffold is difficult b/c of the scaffold’s secondary structure.
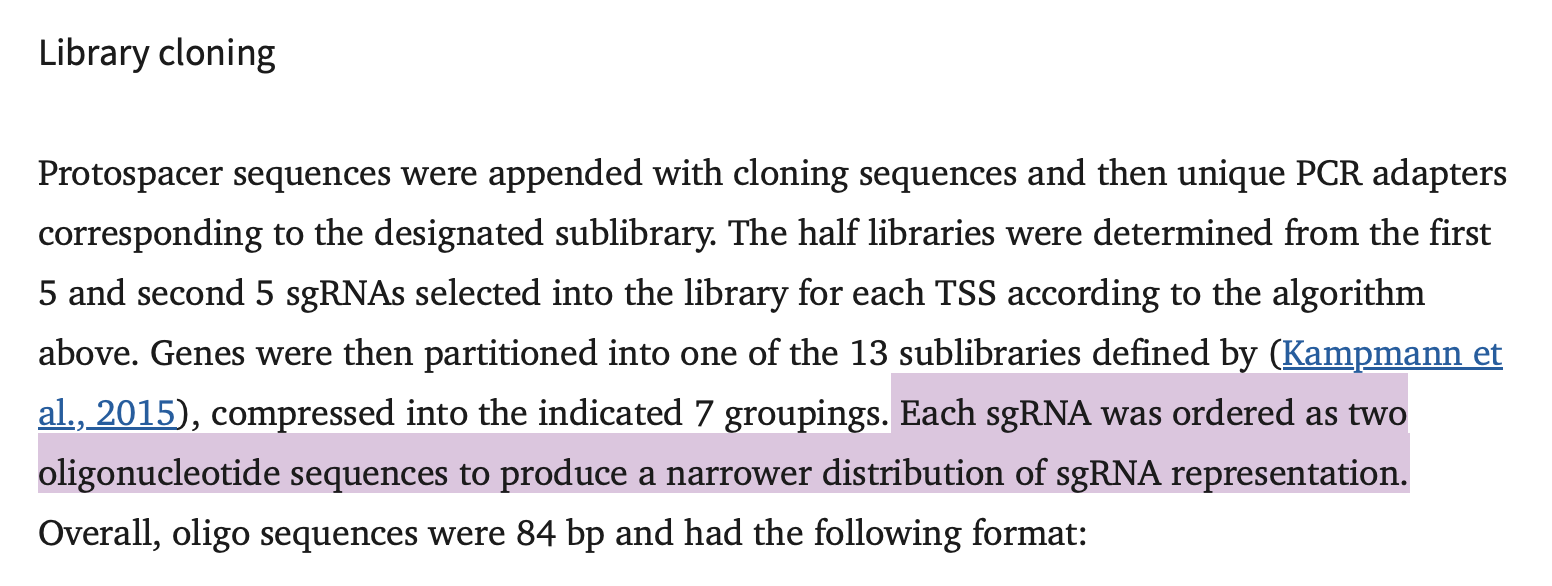
Regardless of the type (CRISPRko, CRISPRi, CRISPRa), the premise is that we need to insert a bunch of small, variable DNA fragments (the “spacers”) into a large, constant piece of DNA
This is a common task in molecular biology so feel free to generalize the protocol and/or take bits and pieces for other tasks. I will be sharing the actual #s I used for a specific experiment but these can always be scaled.
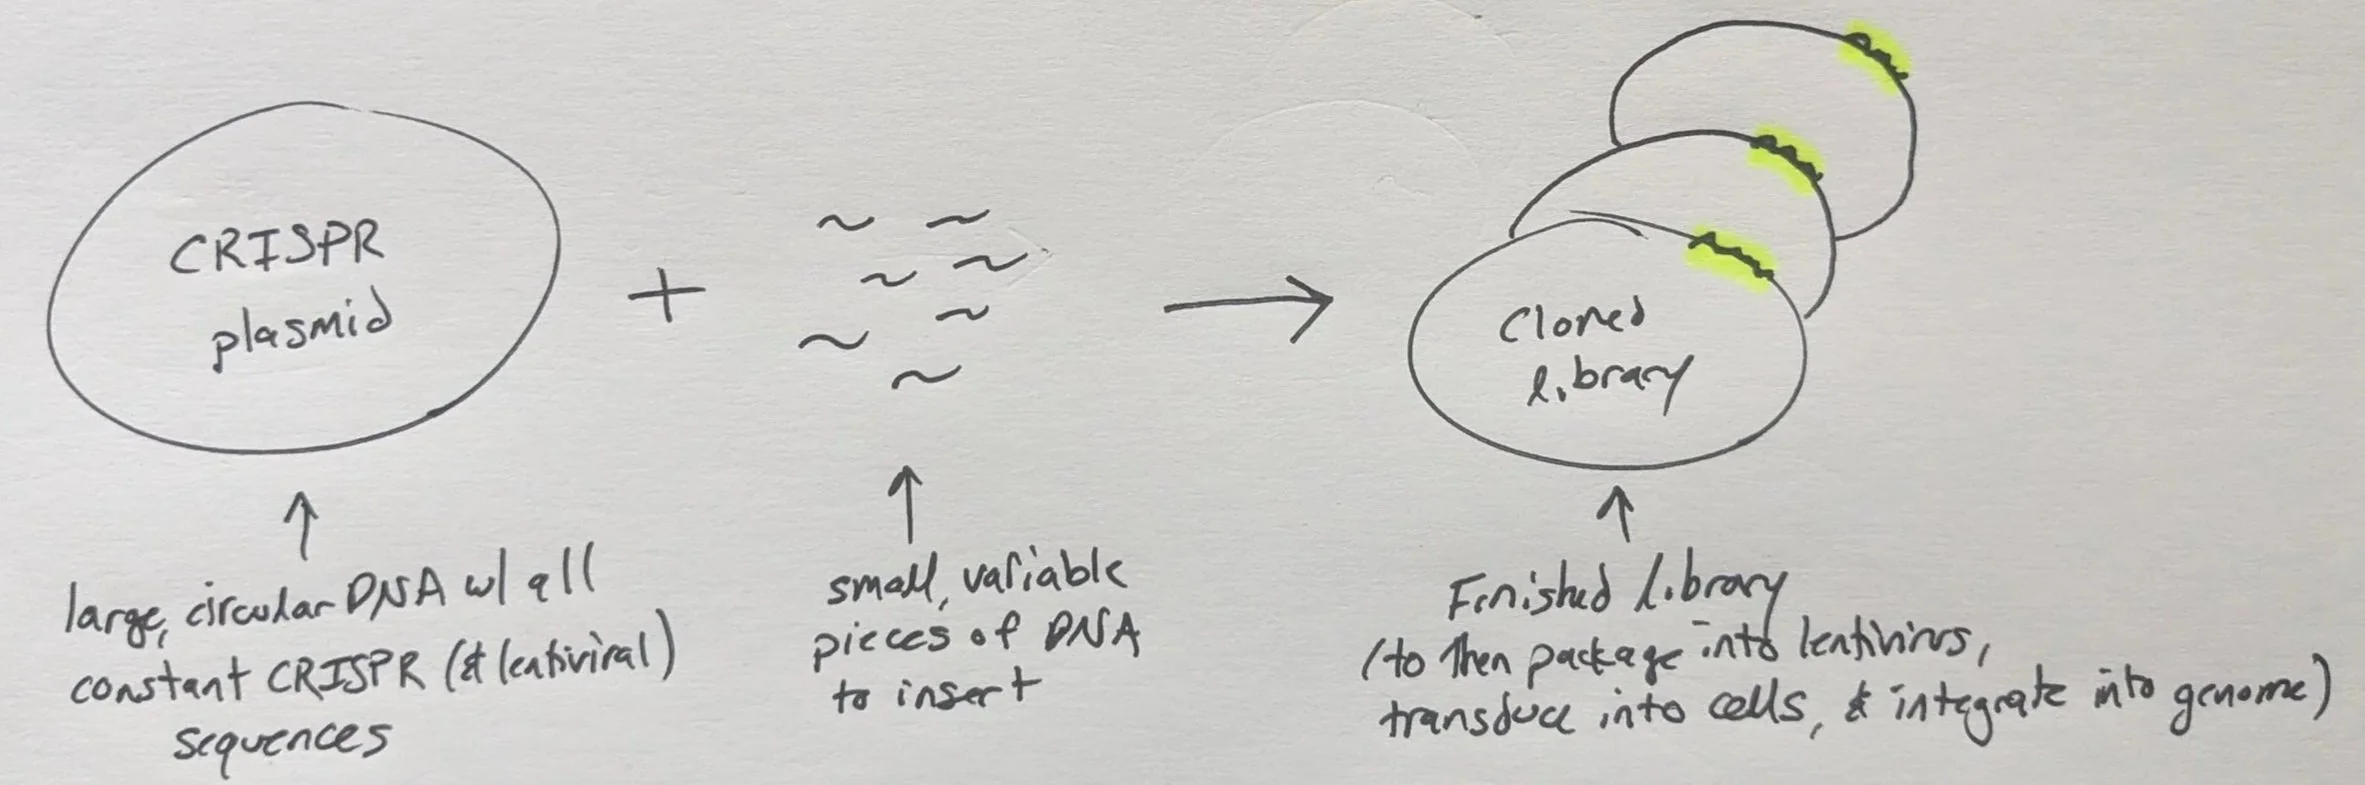
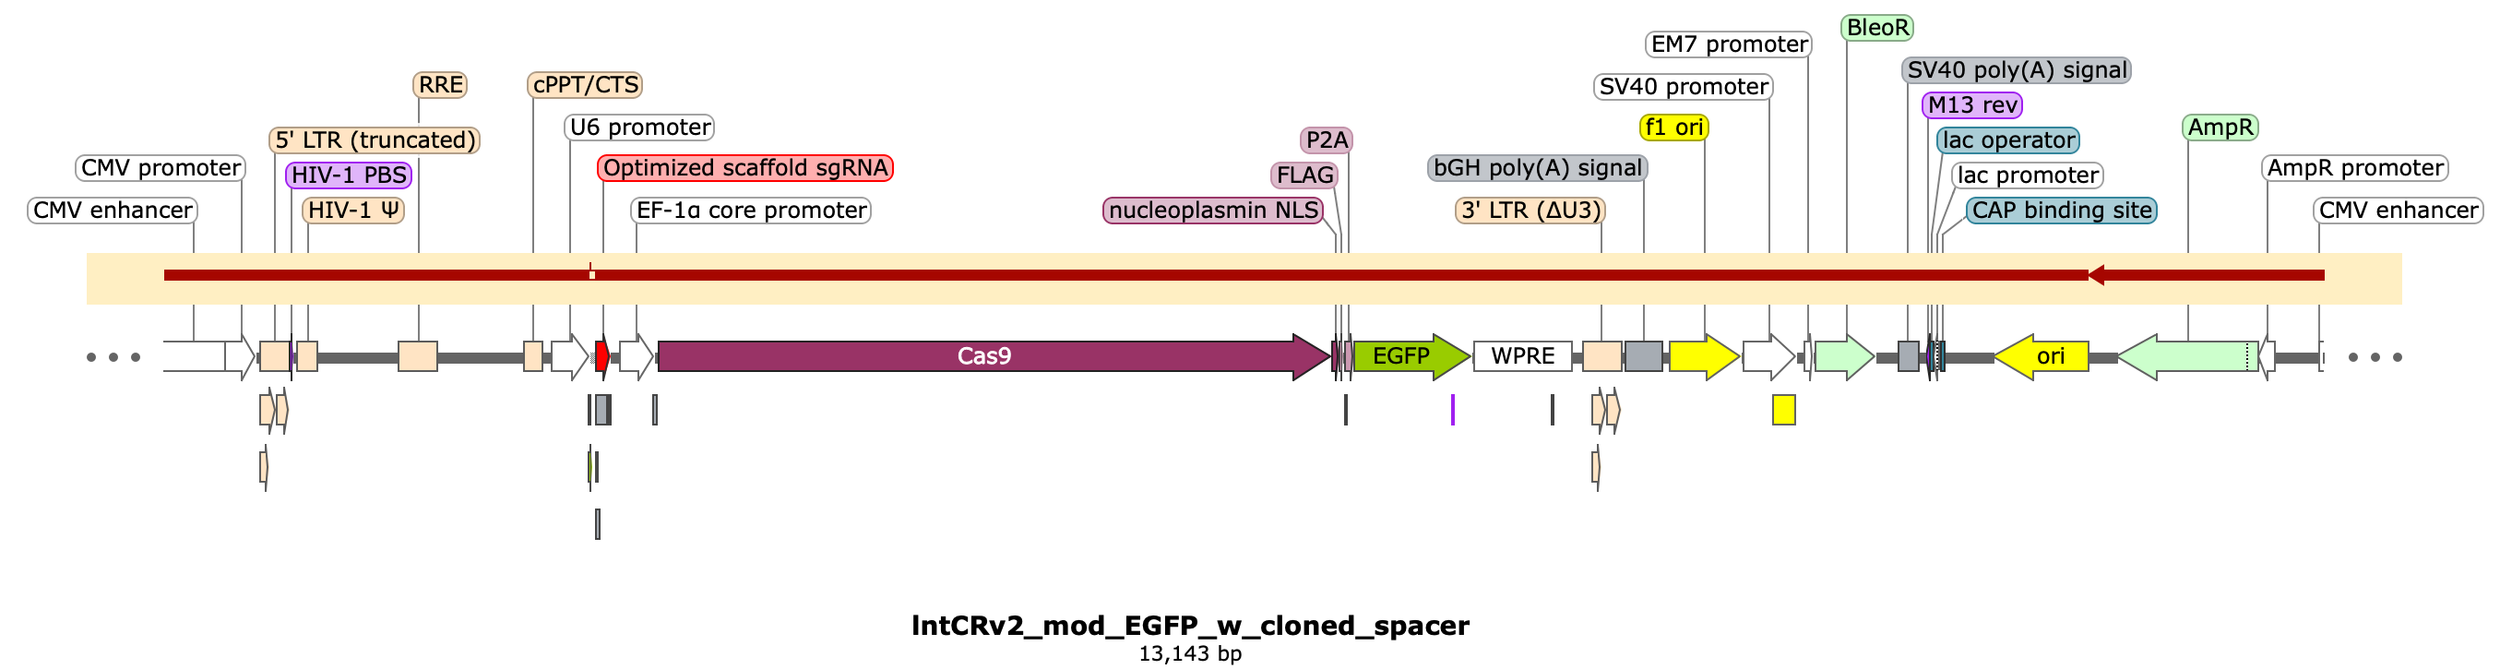
I’ll be using the lentiCRISPRv2 (“lntCRv2”) plasmid from Feng Zhang’s lab at MIT & Broad (https://www.addgene.org/52961/)
Here’s the map:
I’ve highlighted the DNA encompassing the lentiviral cassette which includes:
The 5’ and 3’ LTRs as well as HIV-1 Ѱ (Psi), RRE (rev response element), gp41, and cPPT/CTS (central polypurine tract / central termination sequence) - all critical components of the lentiviral genome that enable successful virion packaging.
The (human) U6 promoter for expressing small RNAs by recruiting pol III.
The core scaffold sequence of an optimal guide RNA (gRNA) that will complex with SpCas9 enzyme and target it to a specific region in the genome once a spacer sequence is inserted at the 5’ end of the gRNA (i.e. our main task).
The protein-coding sequence of Cas9 (our programmable nuclease), driven by the EF-1a core promoter (strong, compact human promoter) directly upstream.
P2A and PuroR protein coding sequences attached to the end of the Cas9 sequence to make a fused protein coding construct that will be transcribed as a single “bicistronic” RNA molecule and, later, translated into separate proteins.
The WPRE element, included in the 3’ UTR of our bicistronic transcript which enhances stability of the mRNA thus improving protein expression.
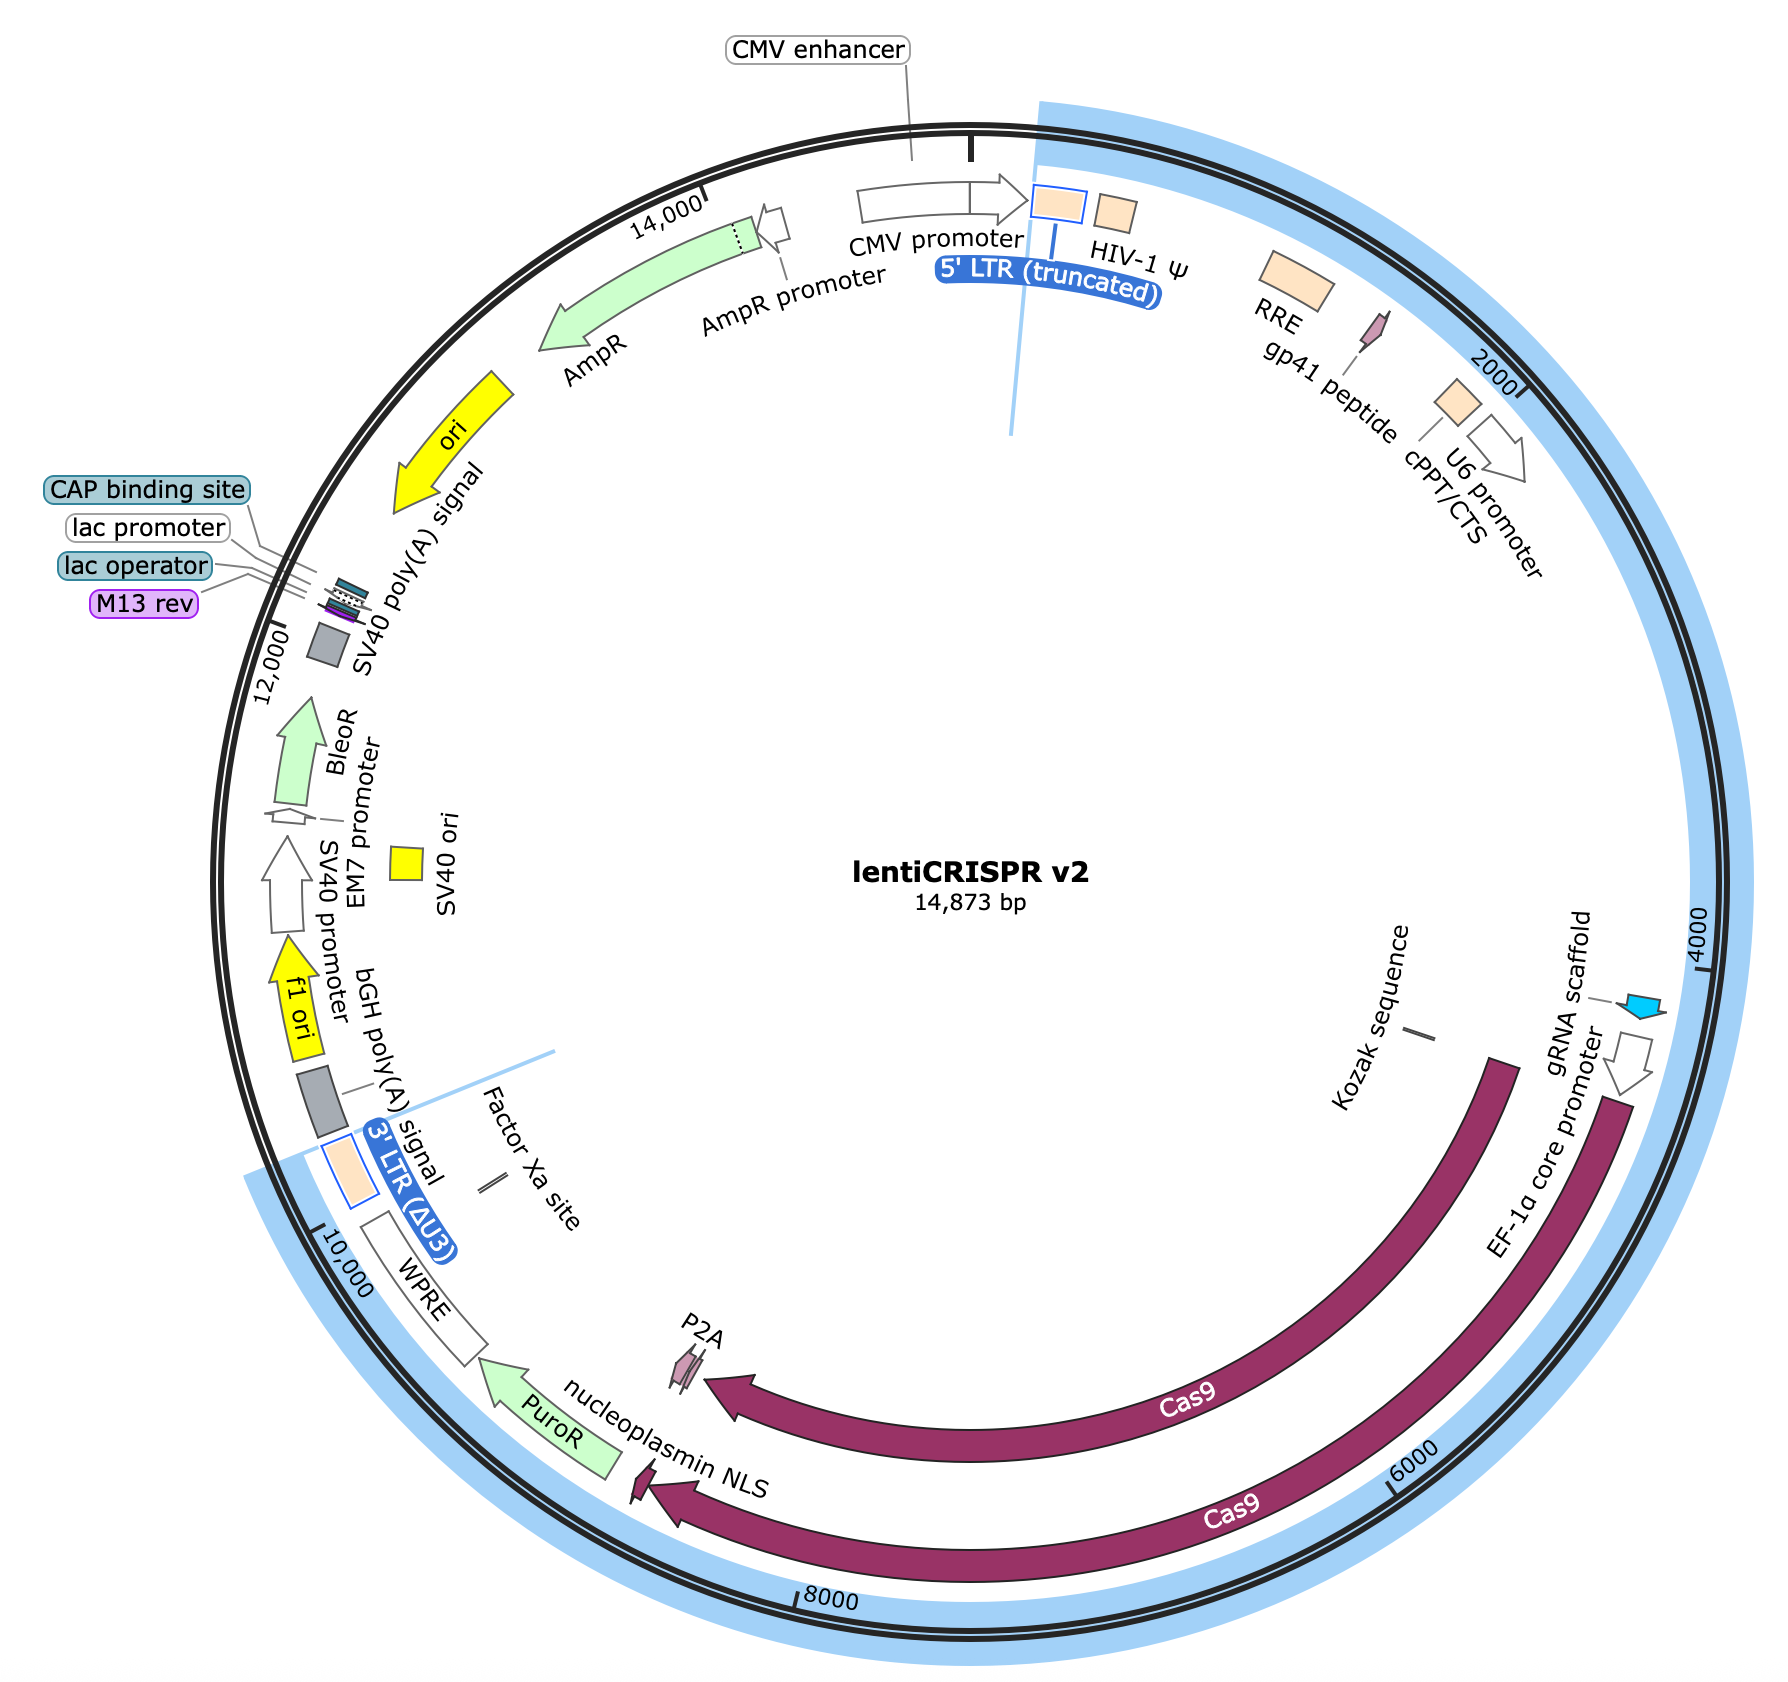
Workflow
First, we’ve got to digest our plasmid using BsmBI or Esp3I (an isoschizomer). This will open the plasmid right at the site where we want to insert our library of small spacers (directly downstream of the U6 promoter & upstream of the constant sgRNA scaffold).

You can see how the placement of the BsmBI (type IIS) restriction sites will allow us to scarlessly swap in our spacers while bridging the end of the U6 promoter with the start of the gRNA sequence

…

You can also see how the gRNA scaffold sequence ends with a poly-thymidine sequence (“TTTTTT”) which will terminate pol III transcription
Note for later: "The transcription start site after a U6 promoter is typically considered to be at the "+1" position (23 nt downstream of the TATA box), with a "G" nucleotide being the preferred initiation nucleotide. Thus, the first base transcribed after the U6 promoter is usually a G." - https://pmc.ncbi.nlm.nih.gov/articles/PMC4040628/
The sequence of human U6 promoter:
GAGGGCCTATTTCCCATGATTCCTTCATATTTGCATATACGATACAAGGCTGTTAGAGAGATAATTGGAATTAATTTGACTGTAAACACAAAGATATTAGTACAAAATACGTGACGTAGAAAGTAATAATTTCTTGGGTAGTTTGCAGTTTTAAAATTATGTTTTAAAATGGACTATCATATGCTTACCGTAACTTGAAAGTATTTCGATTTCTTGGCTTTATATATCTTGTGGAAAGGACGAAACACCG
Why have such a large chunk of DNA in between the restriction sites if we’re just going to excise it? Because it makes it easy to confirm visually on a gel that the plasmid has been cut at both sites (“double digested”) as opposed to just once, which would cause issues later. Also, I’ve found that more space between restriction sites leads to more efficient double digestion as it ensures there’s less steric hindrance between the restriction enzymes (REs) as they scan and cut the DNA and that the REs (which are endonucleases) aren’t inhibited by trying to find & cut their recognition site near the end of a DNA molecule… both conclusions have been empirically determined but others in my lab have made similar observations independently.
Digest 10 ug of lntCRv2 plasmid w/ BsmBI-v2
440 uL dH2O
50 uL r3.1 buffer (10X)
10 uL of lentiCRISPRv2 plasmid (~1100 ng/uL)
10 uL of BsmBI-v2 enzyme (from NEB)
Incubate 55C for 2hr at 1300 rpm (mixing not essential but I have the option so why not)
Omit heat inactivation and proceed to purify digested DNA by 0.6X SpriSelect (or column), eluting in 100 uL dH2O
For details on purification by Spri (recommended), see below
Measure by Nanodrop
BsmBI-v2 digested lntCRv2) 100 ng/uL (1.9/2.1) ----*100uL----> 10 ug (90-100% recovery)
Add 11 uL of 10X BlueJuice loading buffer to sample for a total of ~110 uL of digested plasmid + 1x loading buffer
Load 15-25 uL / lane
Run on 1% agarose gel , 180V for 45-60 min w/ 1 Kb Plus DNA ladder (Invitrogen) on each side
Presence of ~2kb band confirms double digested product
Proceed to gel extract top, primary (13kb) band in each lane (see protocol, below)
Why did I digest with BsmBI-v2 (from NEB) instead of FastDigest Esp3I (from Invitrogen)? Because in head-to-head tests I’ve found the former to do better (work faster, digest more completely). Here’s a gel for comparison:

Digested backbone @ ~13kb, presence of band at ~2kb confirms double digested product (bolder band in ladder marks 1.5kb)
In this test, I was digesting a different thing (“gBL_AC001”, a ~150bp DNA fragment also containing two BsmBI/Esp3I restriction sites) and used either BsmBI-v2 (55C, 1hr) or FastDigest Esp3I (37C, 1hr).
The final, double-digested product should be ~100bp. You can see BsmBI-v2 gave me more of the desired product while Esp3I had a lot of uncut and single-cut product as well as other unexplained byproducts…
Note that since the DNA I was working with in this experiment was so small, I preferred to run on a 10% polyacrylamide-based TBE gel (vertically) instead of an agarose gel (horizontally).
Tip: pre-warming the TBE buffer before loading/running a polyacrylamide gel helps ensure crisp bands
For the 10bp ladder, I believe the bottom “rung” (10bp dsDNA) is cut off from this image
…Returning to the lntCRv2 digestion from above, why incubate for 2 hours instead of the 5-15 min recommended by NEB? To ensure all plasmid has been fully digested. We could incubate even longer (e.g. overnight) if we wanted, BsmBI-v2 has little-to-no star activity, however I find that 2 hours is sufficient if not overkill. What is “sufficient”? Conditions which lead to no background after the ligation step. In other words, if there is any single cut (or uncut) plasmid remaining after digestion it will reseal in a later step resulting in false positive transformants which we’d detect later when sequencing to validate the final library.
Sidenote, yes we could phosphatase treat our digested lntCRv2 product to ensure no single-cut backbone re-ligates, however, it’s an extra & unnecessary step if the plasmid is properly digested and will really only reduce our insertion efficiency later on during the ligation.
Gel extraction
I’ll use Zymo’s gel DNA recovery kit to purify the extracted DNA (cat. # D4001)
Cut out primary, 13kb band of DNA (digested lntCRv2 backbone) from each lane of gel (n=6), placing into separate microcentrifuge tubes, then weigh
~200 mg / slice
Add 600 uL agarose-dissolving buffer (ADB) / sample and incubate 50C for 11 min @ 1500 rpm (mixing not essential but why not)
Once gel is completely dissolved (you can check by pipetting soln. up & down with P1000) add 200 uL dH2O to sample and vortex (total vol. now ~1 mL)
Zymo recommends this extra step to aid in large (>8kb) fragment recovery
Transfer 500 uL of melted agarose soln. to Zymo-Spin I column placed in a collection tube. Centrifuge 13,000xg for 60s. Discard flow-through (I use a vacuum for efficiency / simplicity).
Repeat last step by adding remaining 500 uL of melted agarose soln to same column and centrifuging 13,000xg for 60s. Discard the flow-through.
Repeat loading is necessary since each spin column only holds ~800 uL max in the upper chamber. It’s an extra step but only takes a minute and really helps maximize your recovery.
Add 200 uL of DNA wash buffer to column. Centrifuge 13,000xg for 30s. Discard flow through. Repeat 1x.
Note to be very careful with removing the flow-through (wash buffer) after each spin, even a tiny bit of residual buffer on the column will lead to poor quality DNA (low 260/230 values from the guanidine).
Carefully transfer dried columns to new, labeled tubes. Add 10 uL elution buffer / sample. Centrifuge 13,000xg for 60s. Repeat 1x for a total of 20 uL eluate / column
The double elution is to improve recovery of our large DNA fragment. You can also warm the elution buffer to 60C if you really want to maximize DNA recovery.
Pool eluted DNA together (n=6 replicates) for ~100 uL total and quantify on Nanodrop
Digested, gel-extracted lntCRv2) 74 ng/uL (1.8/2.0) ----*100uL-----> 7.4 ug (74% total recovery)
Save at -20C for now
This is a very good recovery for gel extraction, especially b/c we’d expect to lose ~15% of our input mass by design since we’re excluding the excised 2kb fragment. Any recovery rate >30% should be considered fairly successful. I find that there is a sweet-spot w/ gel extraction where you get the best recovery from 1-1.5% agarose gels. Any higher concentration and the agarose starts to inhibit the purification, any lower and a lot of the DNA is lost while running the gel as it diffuses out of the matrix and into the electrophoresis buffer. Also, keep gel slices to 0.1-0.2g (100-200mg) each & pay attention to the kit details.
Extra info: there are other versions of the lntCRv2 plasmid which have a smaller intermediate region to eliminate the need to gel extract the double digested plasmid but I don’t recommend for all the reasons above on RE digestion observations. I’ve found that these “simplified” versions lead to lower cloning efficiency / higher background likely because of the presence of constructs that were only cut once (single digested) and later re-sealed during the ligation step. Again, yes, you could dephosphorylate the ends of a poorly digested plasmid with an extra step but are you then really saving much time compared to gel extraction? Also, removing 5’ phosphates on the opened backbone will reduce the insertion efficiency of your spacers.

The original vector

Modified version w/ shorter intermediate region b/w BsmBI sites (don’t recommend)
Yet another detail…
I’m technically using an updated version of the lntCRv2 vector that includes an optimized sgRNA scaffold sequence for more efficient transcription and improved stability (thus, increasing editing rates). Here’s the alignment between the default scaffold sequence in the lntCRv2 vector from the Zhang lab (top) and the version I’m using, kindly provided by a postdoc in our lab (bottom). You can see the two scaffolds mostly match (SnapGene didn’t handle the alignment well but both start with “GTTT”) except for the sequence encoding the first (large) hairpin
Image of SpCas9 sgRNA scaffold sequence/structure: Briner, A.E., Donohoue, P.D., Gomaa, A.A., Selle, K., Slorach, E.M., Nye, C.H., Haurwitz, R.E., Beisel, C.L., May, A.P., and Barrangou, R. (2014). Guide RNA functional modules direct Cas9 activity and orthogonality. Mol. Cell 56, 333–339.
Optimized sgRNA scaffold sequence (1/2): Chen, Baohui et al. “Dynamic imaging of genomic loci in living human cells by an optimized CRISPR/Cas system.” Cell vol. 155,7 (2013): 1479-91.
Optimized sgRNA scaffold sequence: (2/2): Dang, Y., Jia, G., Choi, J. et al. Optimizing sgRNA structure to improve CRISPR-Cas9 knockout efficiency. Genome Biol 16, 280 (2015).
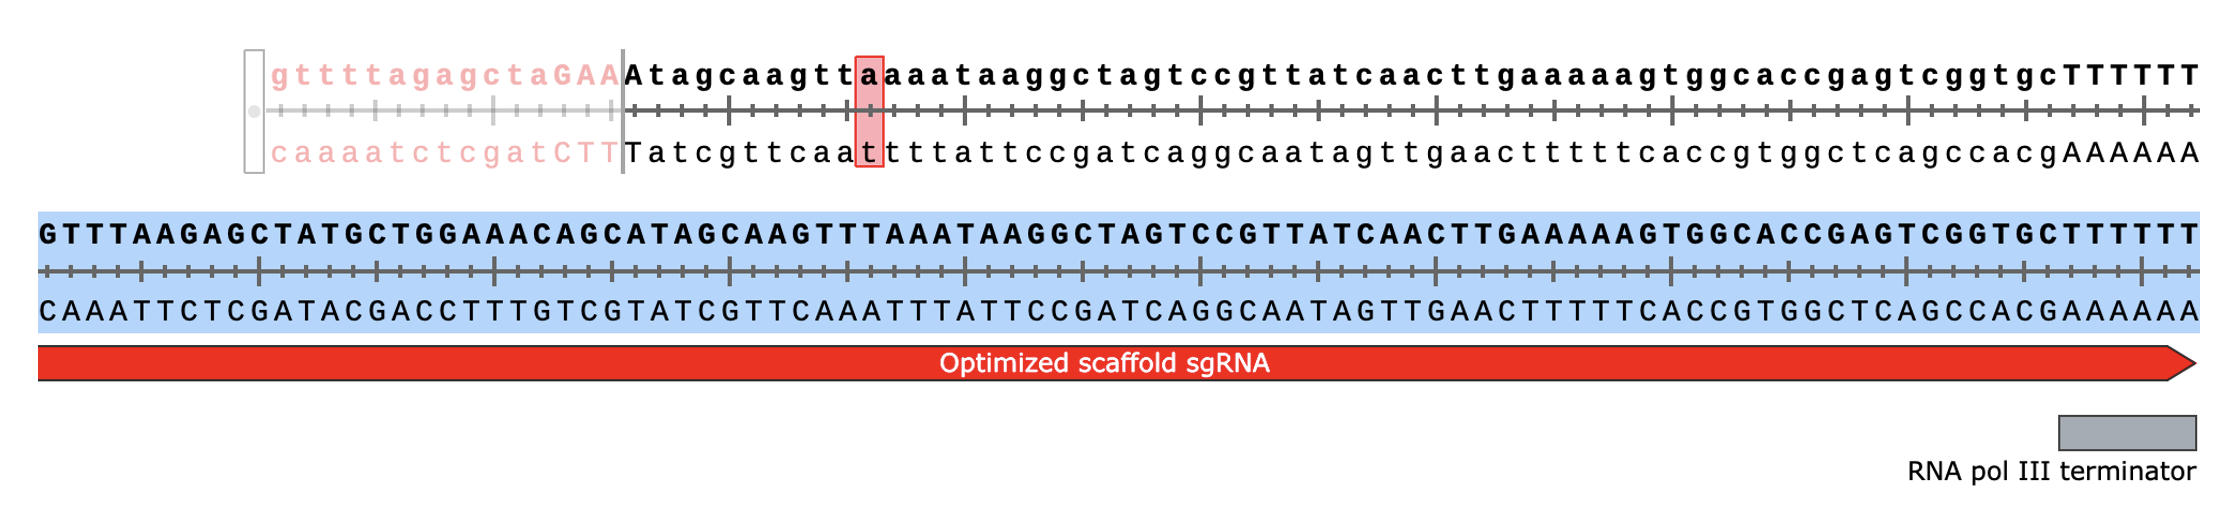
In addition to mutations that improve transcription, the optimized sgRNA scaffold sequence also has a larger upper stem in the primary hairpin to improve the sgRNA’s stability (and recruitment of Cas9?).

Preparing the inserts
This protocol assumes you’ve already selected your spacers, i.e. the 20 nucleotide DNA sequences that complement your target organism’s genome, reside next to a viable PAM site (e.g. 5’-NGG-3’), and localize SpCas9 (or its derivatives) to a particular genomic site to induce a dsDNA break (CRISPRko) or modulate transcription (CRISPRi / CRISPRa).
I like this graphic from https://www.biotechacademy.dk/en/high-school-projects/crispr-cas9-the-genetic-engineering-revolution/cas9-and-dna-identification/ to visualize the orientation of the desired complex since it has the spacer in the 5’-to-3’ direction matching the top strand of the genomic DNA (gDNA) which is how I always like to think about it

I guess it’s Danish b/c “sekvens” = “sequence”Here are some resources for spacer selection, including links to validated CRISPR libraries:
https://design.synthego.com/#/ (looks like they’re sunsetting this… sad)
Improved vectors and genome-wide libraries for CRISPR screening (https://www.nature.com/articles/nmeth.3047)
Compact and highly active next-generation libraries for CRISPR-mediated gene repression and activation (https://elifesciences.org/articles/19760)
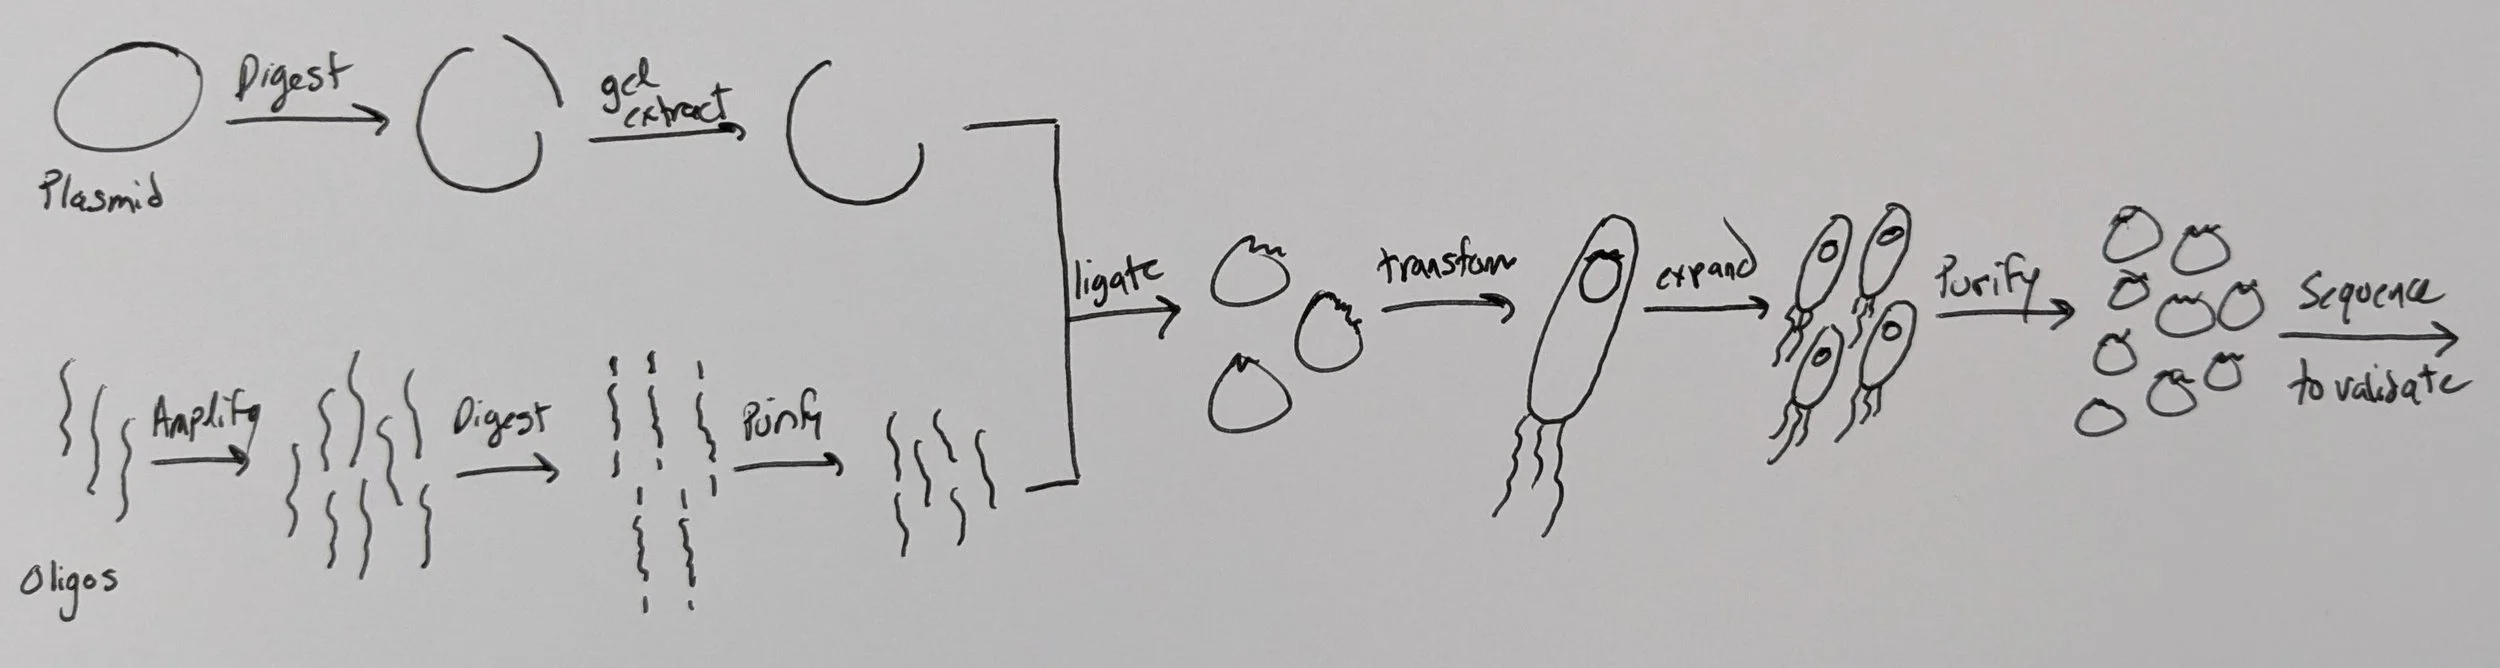
Now, thanks to old chemistry (phosphoramidites) and modern technologies, we can simply order our DNA library of chosen spacers to be synthesized (essentially, printed) directly by a company and sent to us. I tend to use TWIST Biosciences but no obligation. Why not just print the final things we need? Cost and technical restraints still limit synthesis to <300 nt oligos. Also, it would be a waste of money because >90% of the final library construct is fixed/constant from molecule to molecule.

“Blue: The phosphoramidite moiety. Green: A Dimethoxytrityl (DMT) group protecting the 5’ hydroxyl group on the deoxyribose. Yellow: A diisopropylamino group serves as a leaving group which in the presence of an azole catalyst is removed and links the phosphoramidite to the growing oligonucleotide. Orange: A 2-cyanoethyl group that protects the second hydroxyl on the phosphite Pink: A variable group that protects amino groups in the nitrogenous base - these are removed at the end in alkaline conditions.” ————————>

From https://www.twistbioscience.com/blog/science/simple-guide-phosphoramidite-chemistry-and-how-it-fits-twist-biosciences-commercialFun fact, this means DNA is produced 3’-to-5’ here which is opposite the direction it is synthesized in nature (5’-to-3’)

TWIST will supply us with a lyophilized pool of all requested oligos mixed together in somewhat equal amounts (more on this later), however, the total material of this pool will be quite low; typically 10-100 ng total. TWIST guarantees supplying > 0.2 fmol of each oligo design in the pool. That’s a minimum of 2E-16 moles or 120 million molecules per oligo design. The latter # might sound like a lot but by mass it’s minuscule amounts to work with, even if we order a library of 1,000 oligos (which is actually quite small for today’s libraries). Here’s the conversion:

To avoid any material limitations, and to ensure we can easily insert these small DNA fragments into our digested backbone, we want to design & order our 20nt spacers with constant regions at each end. I’ll refer to these as “adaptors” which will include the same restriction sites as in our lntCRv2 backbone as well as outside “handles” for PCR amplifying the library.

With the adaptors, the final oligo design is 118 nt in length (well within reason for large scale synthesis). The sequences comprising the PCR handles annotated at each end of the oligo were chosen somewhat randomly except to satisfy a few key primer parameters to ensure successful amplification by PCR: a ~50% GC content (i.e. even base representation), a length of ~20nt, and an estimated melting temp. ~= 60C. Worth noting, we’re only ordering/receiving the top strand of DNA from the fragment above (not the duplex)
You can also see that the presence and orientation of the BsmBI/Esp3I recognition sites in the design will produce a final ~25bp dsDNA fragment (highlighted in blue) containing the spacer sequence, a 5’-G to serve as the hU6 promoter’s TSS, and 4 nt overhangs (“sticky ends”) at the 5’ end of each strand after PCR (to form dsDNA) and digestion. These exposed ends will allow the final fragment to hybridize perfectly into our digested lntCRv2 backbone (refer to plasmid map above to confirm) during ligation.
Lastly, the “random filler” sequences on each side of the spacer+cutting regions were included so that, after double digestion of the 118 bp fragment with BsmBI, the resulting DNA products do not overlap in size which would complicate downstream steps including interpretation of digestion efficiency by gel as well as final fragment purification depending on the method (see below for details). With the design above, digestion w/ BsmBI will produce a ~25 bp spacer fragment (our desired product) ready for insertion as well as 45-50 bp end pieces to be discarded.

Theoretical gel of insert library after complete digestion with BsmBI/Esp3I
If you don’t have as much difference in the size/length of your insert and end fragments, you can increase the separation by running on a 20% polyacrylamide TBE gel
Library costs
But Ryan, won’t adding a bunch of random filler sequence to each oligo increase synthesis costs? Actually no, but I appreciate that you’re keeping costs in mind. I’ll end this protocol talking about direct costs of cloning a CRISPR library.
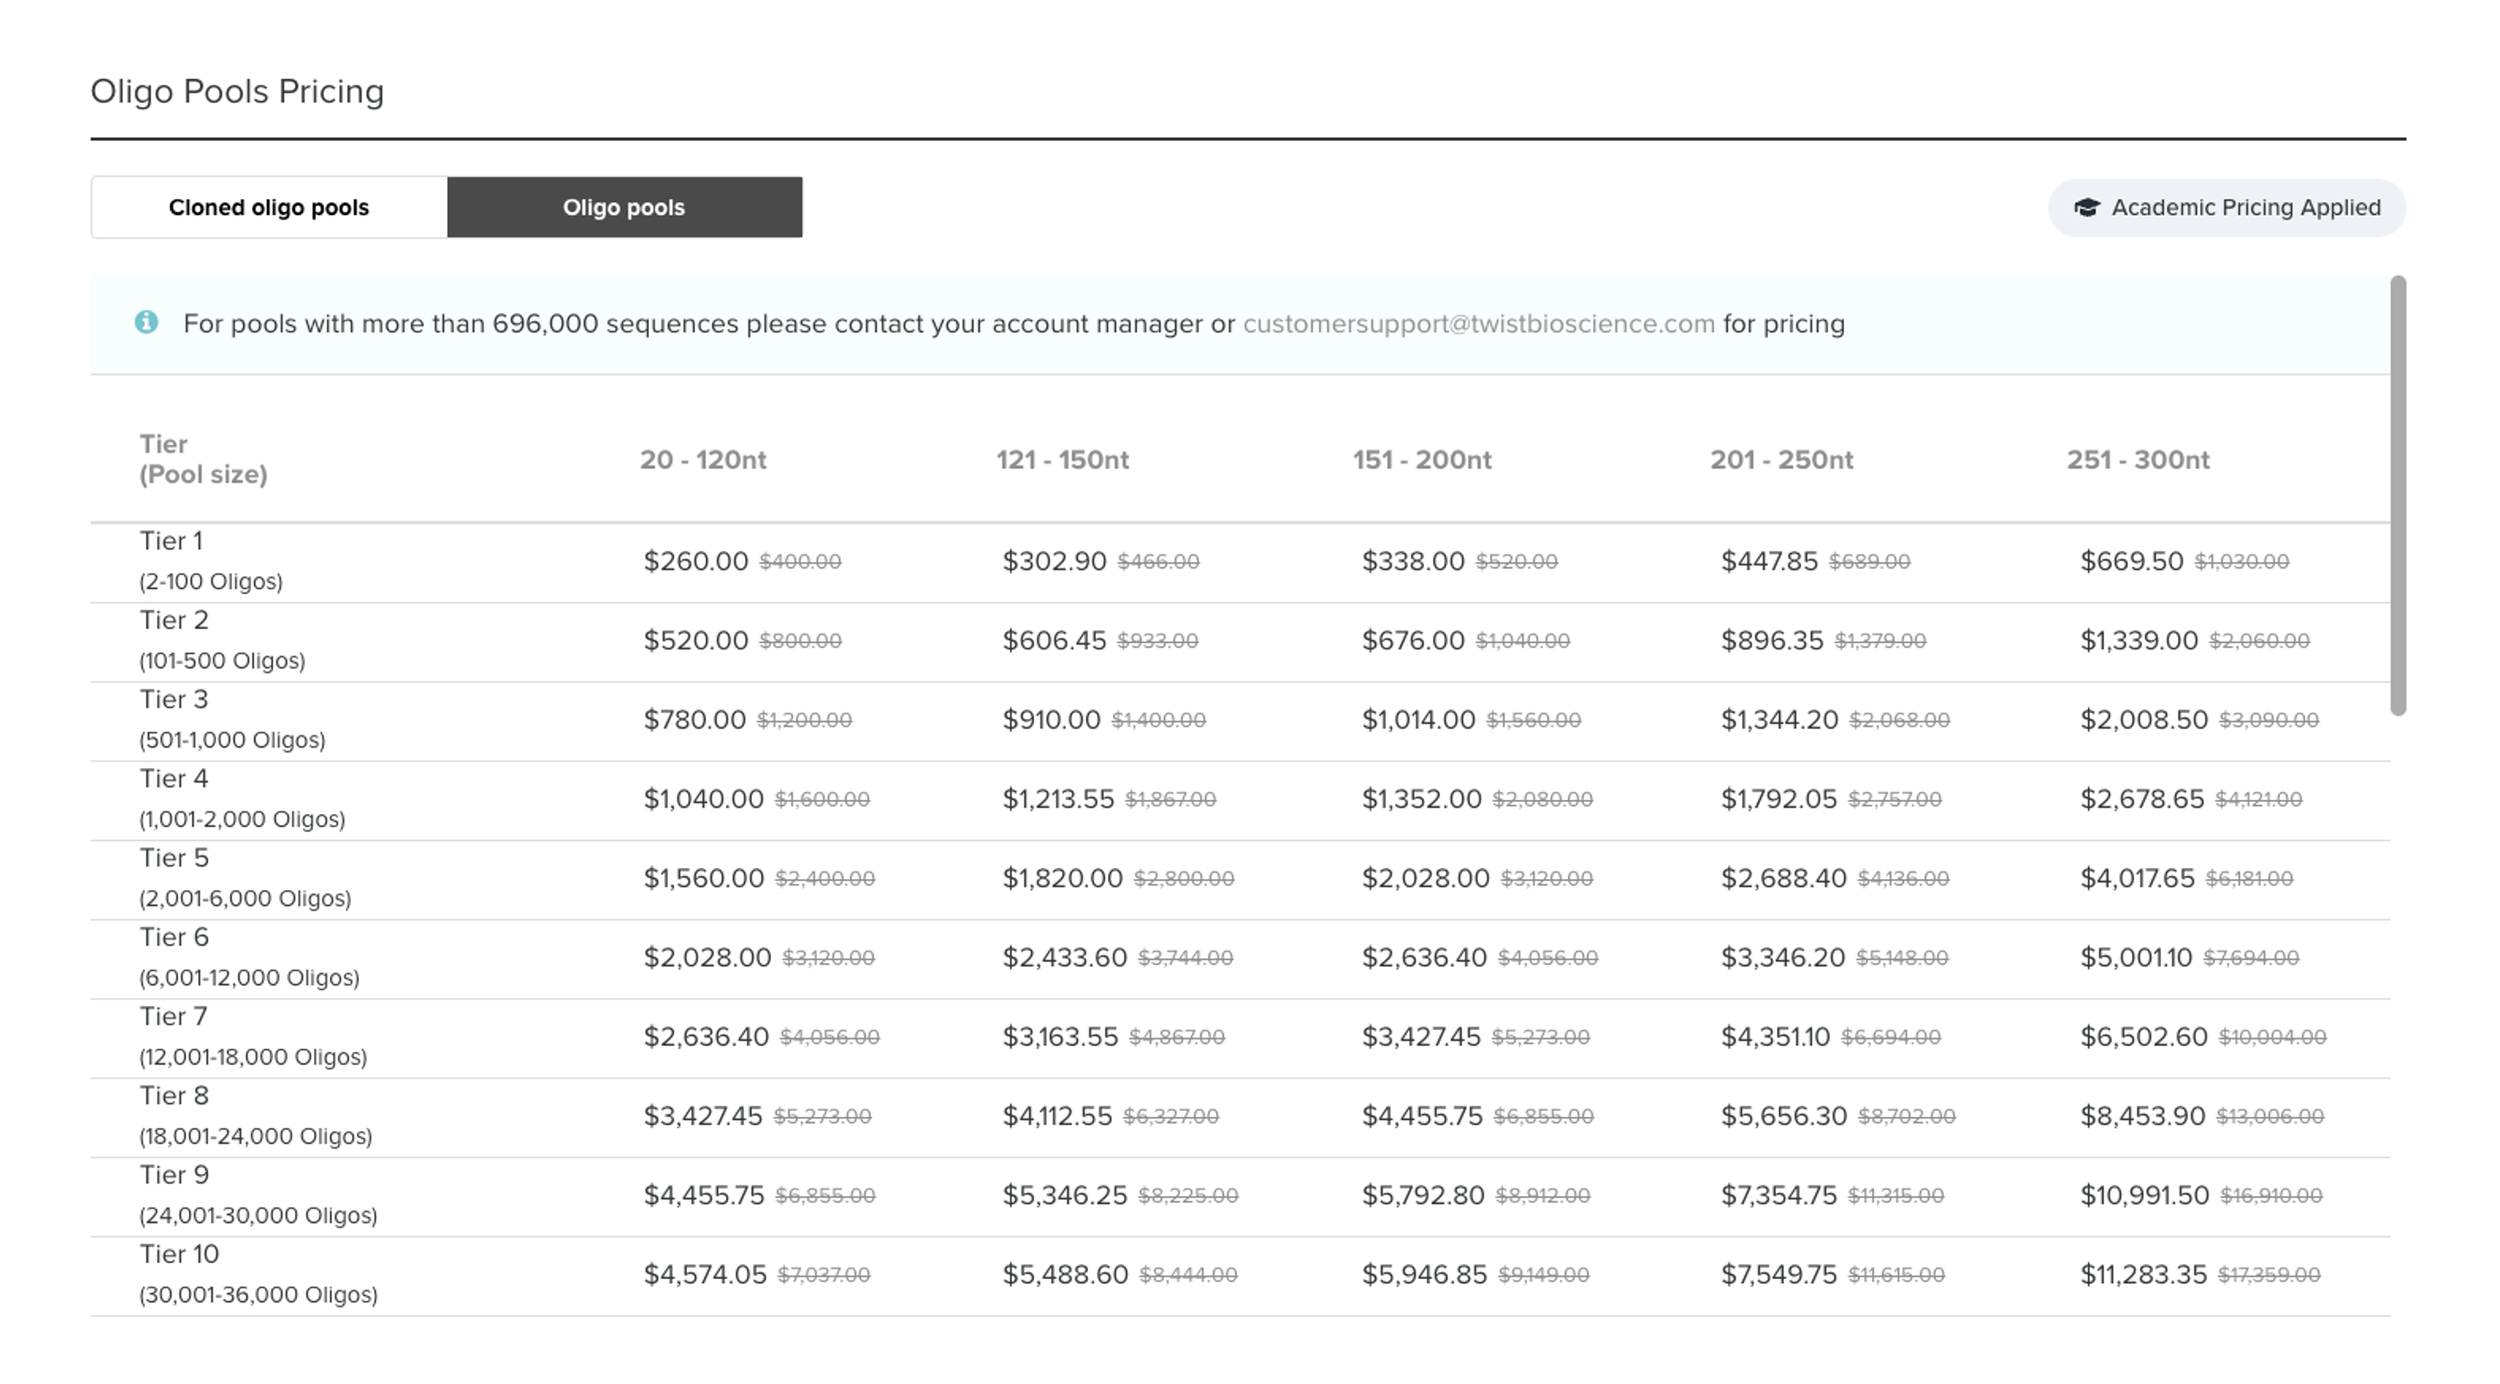
Why does cost not change? TWIST works on a tiered system so ordering a library of 80nt oligos (i.e. our design w/o the filler regions) is the same as ordering a library of 118nt oligos (w/ the fillers). In addition to the size of your oligos, the other factor contributing to library cost is the total number of unique oligos (i.e. spacers), which is also tiered. TWIST pricing scheme, as of Aug. 2025, on the right:
As you can see, for a fixed # of oligos (in my case, n=310), there is no change in cost whether I design them to be 20nt or 120 nt. Now, synthesis error rates should also be taken into account, the longer the oligo the more likely one is to contain an error, but in reality modern error rates are quite low (1:3000 nt i.e. one error every 25 molecules)
Amplifying the insert library
Before I mentioned that TWIST, or any other supplier of ssDNA libraries, provides the final oligo pool with relatively even amounts of each oligo design. How even? It’s hard to find company guarantees but I’ve read somewhere a 95/5 ratio <5 should be expected. This means the total amount of material (molecules) encompassing the top 5% most abundant oligos in the library is less than 5x more than the total amount of material (molecules) comprising the 5% least abundant oligos. It’s essentially a statistic for the width of a normal (Gaussian) distribution.
Side note, I actually don’t love using this stat to summarize the uniformity of a library since it assumes it’s normally distributed.. a better stat is the Gini coefficent (derived from a Lorenz curve) which we’ll discuss later

“PCR0” - amplifying the original oligo pool (“insert library”)
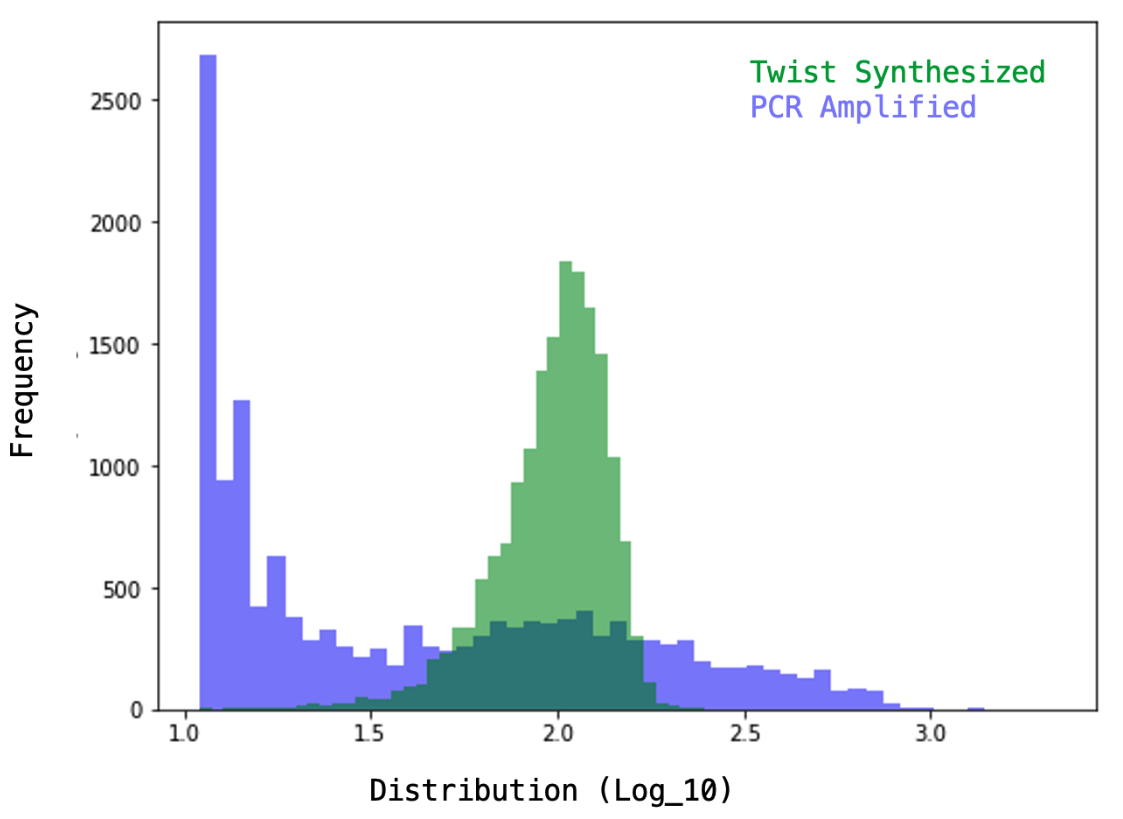
Ideally, we’d receive a perfectly uniform library with exactly the same amount of molecules per oligo design (i.e. a 95/5 = 1) however life’s not ideal. So, given the distribution of the pool of oligos supplied to us, our goal when cloning a library is really just to not bias/skew it any more than it already is (keeping the width of the distribution as tight as possible i.e. the 95/5 as small as possible). This is actually very hard in practice since our workflow contains many manipulations of the oligo pool during which it becomes very easy to “bottleneck” the library and lose representation. Why do we care so much? B/c any bias in the final cloned library will be carried into our screen(s) which threatens to (1) crash our experiment and/or (2) limit our final results to only the oligos/conditions which were most represented in the library. Nothing is worse than putting in all the work to screen a 10,000 oligo library only to detect a small fraction of them (e.g. 10-100 oligos) in the output. This happens all the time though and is particularly bad when dropout from bottlenecking the library is misinterpreted as a true phenotype.
Therefore, since we know PCR can introduce bias into a pool of DNA molecules during the process of exponential amplification (see figure above), we want to limit the # of cycles we use to only the bare minimum required to have enough material to work with downstream. In practice, this needs to be determined empirically, but I’ve found that 4-6 cycles is usually sufficient.
Side note, if we’re very clever with our protocols we can actually get away with a 1-cycle PCR (i.e. just a second-strand synthesis to convert the received oligo (ssDNA) pool into dsDNA) however I won’t do that here
So TWIST guarantees > 0.2 fmol / oligo design but here I received 70 ng for a 310 oligo library (each 118 nt in length) meaning I got > 5 fmol / oligo. It’s hard to predict how much they’ll give you in practice but you can typically expect 10-100 ng of total material
Resuspend TWIST library (n=310 oligos, 70 ng total) in 21 uL dH2O
70/21=3.33 ng/uL
3.33/1000/(330g/mol/nt*118nt)*1E12 = 85,593 pM = 0.086 pmol / uL
Prepare PCR master mix (“MM”), enough for n=10 rxns
250 uL Phusion Plus MM
220 uL dH2O
2.5 uL (5’ biotinylated) PCR0_F_primer (100 uM)
2.5 uL (5’ biotinylated) PCR0_R_primer (100 uM)
Vortex to mix and spin down
Aliquot 8x48 uL of MM to strip tubes
Add 3 uL of TWIST library (~10ng) per tube (n=7 tubes)
Add 3 uL dH2O to final, 8th tube (negative control rxn)
Run for 5 cycles
98C for 30,
[98C for 10s, 60C for 10s, 72C for 20s]*5 cycles
72C for 2min
4C hold
Takes about 10 min to complete
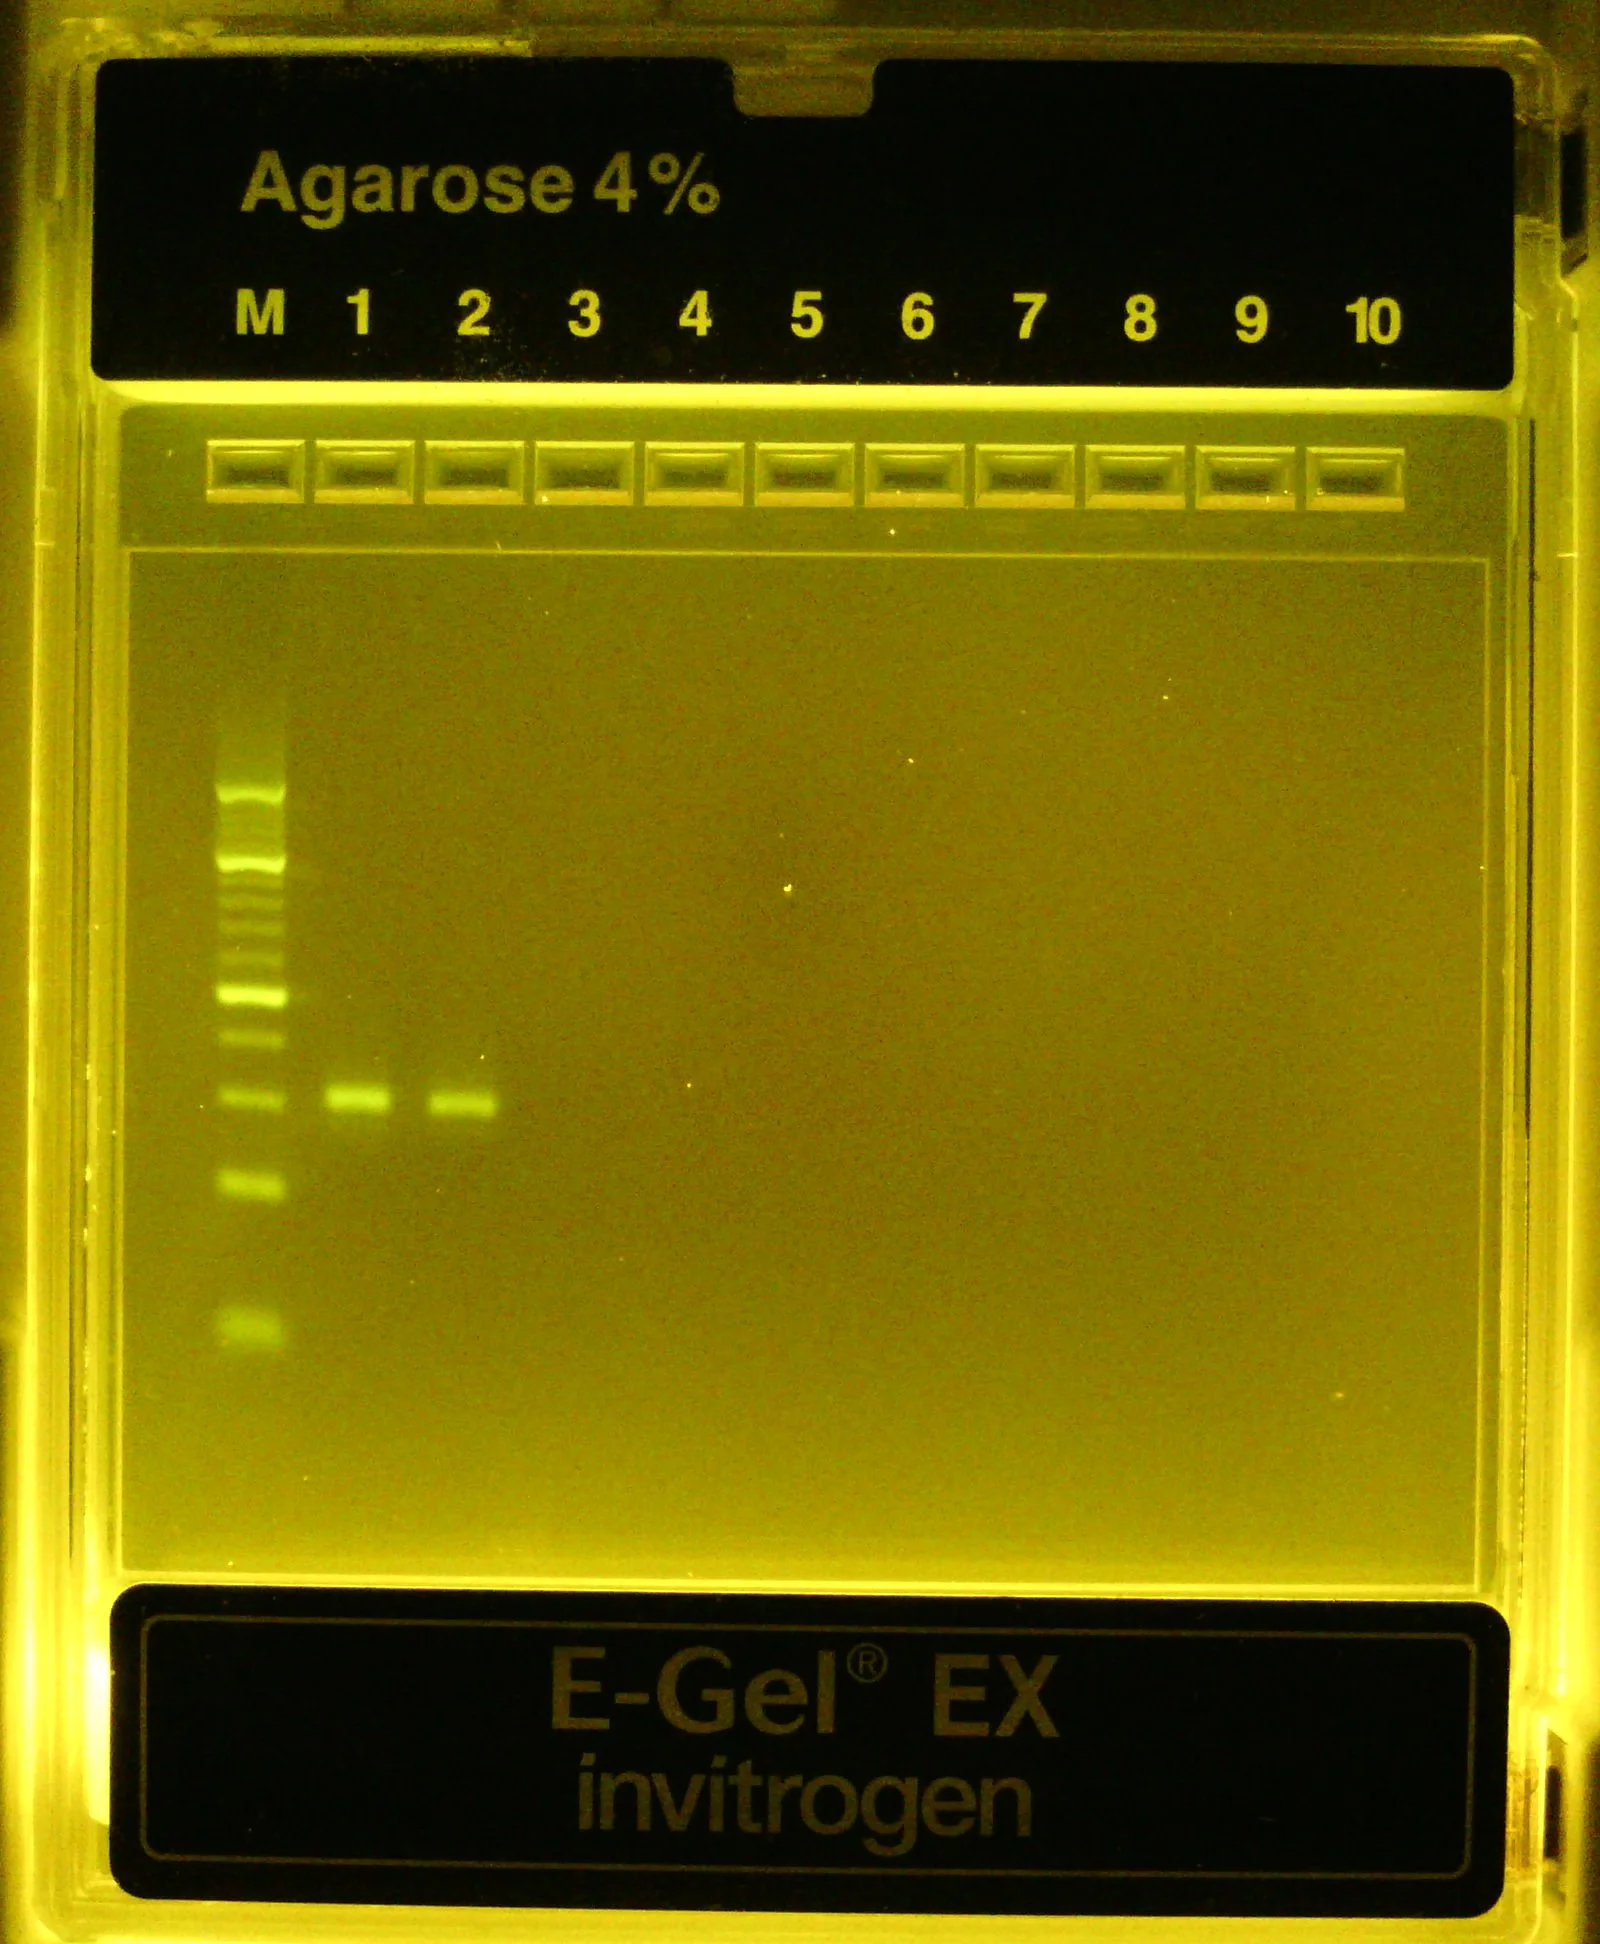
Pool all 7 positive rxns then dilute a 1-2 uL aliquot into 20 uL of dH2O and run on 4% agarose EX gel for 10-15 min
Expect amplicon to be 118 bp
350 uL total of pooled PCR product
Yes, our lab is spoiled w/ pre-cast gels and a fast electrophoresis system. You can also cast your own 4% gel and run for much longer :p

Amplicon is faint but there when it should be! It looks like our 10bp ladder is running a bit fast here (compared to the 100bp ladder) but, even so, the PCR amplicon appears to be at/near the expected size (118 bp)
Purification of short DNA fragments
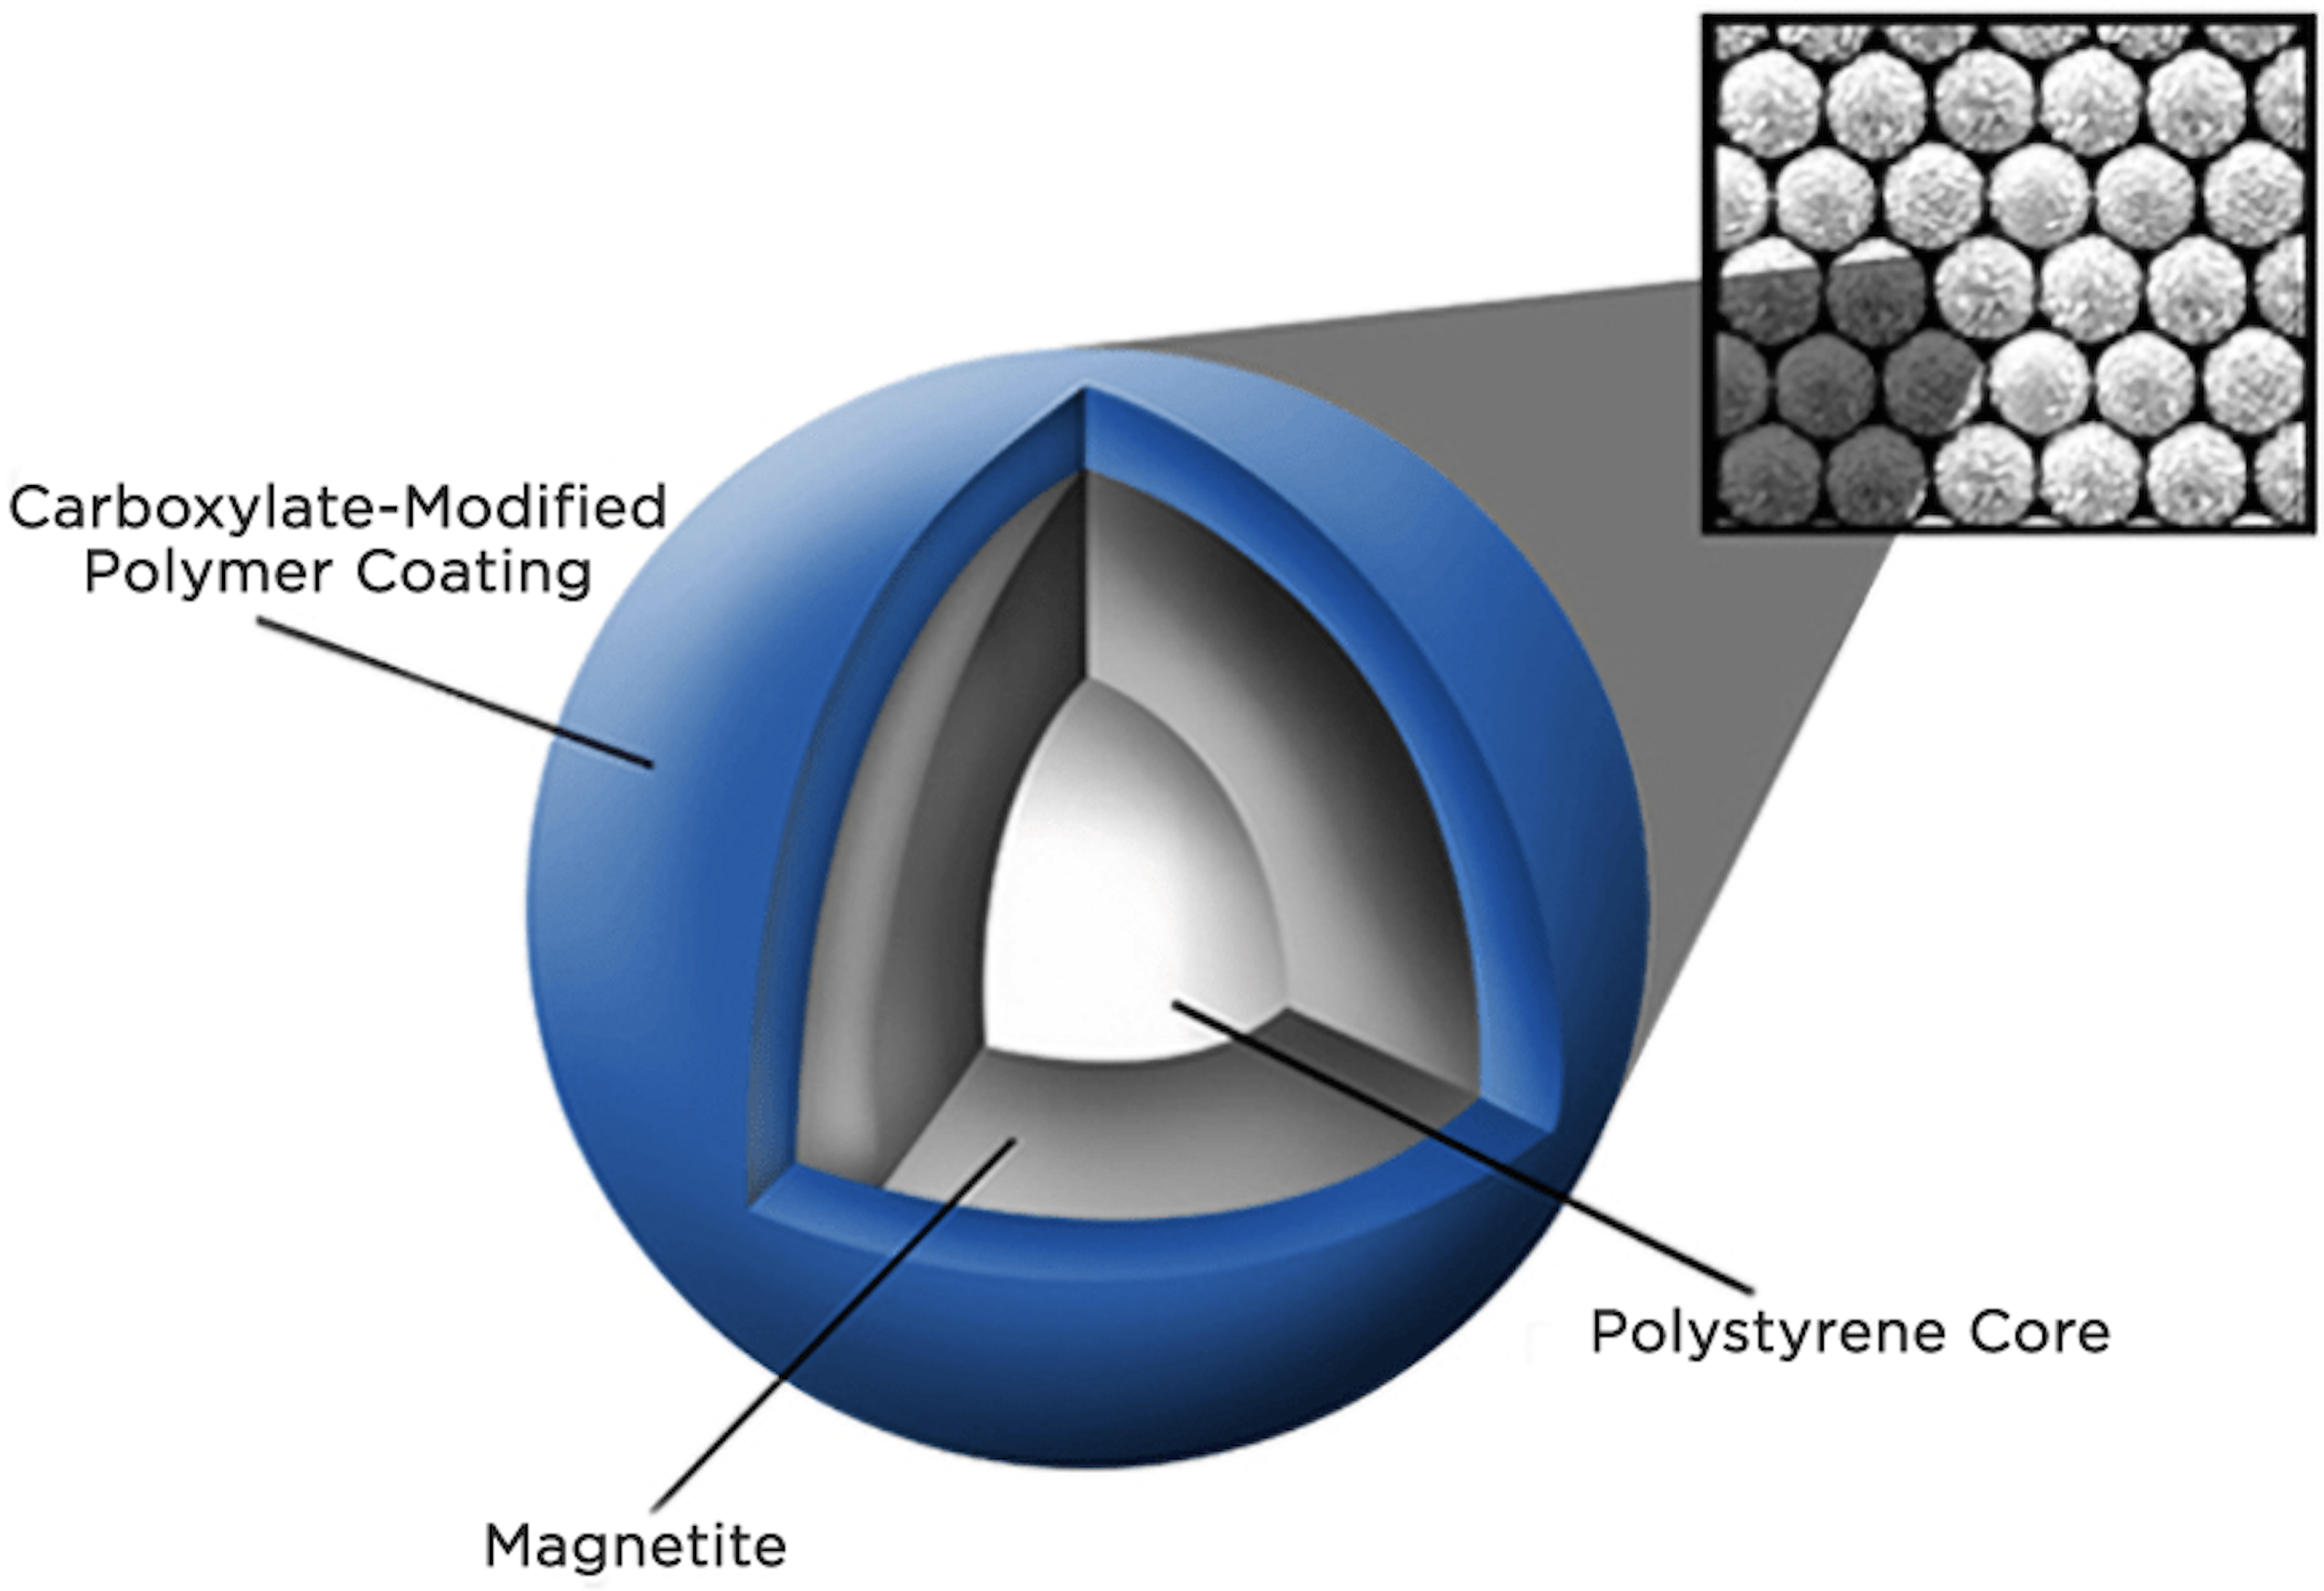
If you haven’t incorporated Spri beads into your nucleic acid purification protocols, I highly recommend. They’re incredibly simple and easy to use and can purify ssDNA, dsDNA, and RNA of all different sizes. Their biggest downside is their cost but homebrew methods are available to make them much cheaper.
Spri beads are small (1 um) paramagnetic beads w/ exposed carboxyl groups suspended in an aqueous solution containing a high concentration of salt (NaCl) and polyethylene glycol (PEG, a crowding agent). When mixed with a crude sample of nucleic acids, the PEG encourages positively-charged sodium cation to ionically interact with both the negative carboxyl group on the beads and the negative phosphate backbone in the nucleic acids, effectively causing the DNA to crash out of solution and onto the beads and stay bound by the formation of salt bridges. I believe the Spri bead suspension also contains a small amount of surfactant/detergent (e.g. Tween 20) to prevent the beads from clumping as well as possibly serving to break up and solubilize any impurities (proteins, lipids, carbohydrates). Washing w/ >70% EtOH maintains the DNA-bead interaction while removing any impurities from the sample while treatment with water causes the nucleic acid to instantly return to solution.
“SPRI” = solid phase reversible immobilization
The binding capacity of Spri beads is very high, allegedly >1 ug of DNA / 1 uL of beads (I’ve never tested this directly but can confirm they bind quite a lot of DNA)
A lot of CRISPR library cloning is working with very small (<200bp) fragments of DNA and I got fed up with the variable yields and purities of different kits so I tested a few different Spri approaches using different ratios of beads-to-sample and isopropanol concentrations, benchmarking on a 10bp ladder to view the selection window, with the following results:
The inclusion of isopropanol, which is less polar than ethanol which is less polar than water, is to encourage smaller nucleic acids to crash out of soln. and onto the beads


polyethylene glycol (PEG)

https://www.beckman.com/resources/technologies/spri-beads
pH = 7
10% polyacrylamide TBE gel run at 180V for 30 min & stained for 10 min w/ 1X SybrGold Including 67% isopropanol w/ 1X Spri results in 100% recovery of small (>=10bp) dsDNA
Purification of amplified library by IsoSpri
Once amplification is confirmed by gel, proceed to purify… I like to use Spri beads with isopropanol (“IsoSpri”) for small (<150bp) DNA fragments altho you can also use a kit e.g. Zymo’s Oligo Clean & Concentrator (cat. # D4060) which uses lots of EtOH to precipitate small DNA onto silica-based columns
Add 350 uL SpriSelect beads to 350 uL of pooled PCR product
i.e. a 1X Spri-to-sample ratio
Add 200 uL of 100% isopropanol to sample (~20% final conc. by vol.)
Don’t need that much isopropanol here b/c the DNA is relatively long (118bp) compared to what it will be after digestion
Vortex to mix and incubate 5 min RT then apply to magnet
Once all beads stuck to wall of tube, remove & discard sup.
Wash beads 2x with 85% EtOH on magnet
Dry beads (spin down, magnetize, removal residual liquid)
Apply 45 uL dH2O to beads, vortex to resuspend, then re-apply to magnet until all beads stuck to wall of tube (elution step)
Transfer eluate to new tube, careful to not disturb magnetized beads as the volume is withdrawn, then measure by nanodrop
Amplified library) 40 ng/uL (1.8/2.0) —*45uL—> 1.8 ug total
Theoretical maximum = 70*(2^5) = 2.24 ug
So we recovered ~80% of the theoretical maximum, not bad. The discrepancy could be because our PCR wasn’t 100% efficient, we lost some DNA during purification, TWIST overestimated the delivered amount, and/or because not all of the received DNA was resuspended. Small losses between steps are expected and, regardless, we now have plenty of dsDNA to work with (1700 ng vs. the 70 ng of ssDNA that we started with)
Digest amplified library
Thus far, we have successfully amplified our library of synthesized spacers (+ adaptors) > 10-fold and purified it. Now, we need to digest this library to get rid of the adaptor sequences on each end (i.e the PCR handles and filler regions) to produce the final ~25bp dsDNA fragments intended for insertion into the lntCRv2 backbone.
For digestion of the library, we will use Fastdigest Esp3I (Invitrogen) instead of BsmBI-v2 (NEB). Why, if the latter was shown to be more efficient? Because digestion will produce a 25bp final product that is very susceptible to melting apart. The melting temp of such a fragment is ~60C which means, by definition, that at 60C half of all fragments are expected to be melted. The incubation temperature of BsmBI-v2 is 55C, very nearly the Tm of our final product. The concern here is that any digested fragments that melt will not be able to properly ligate into the backbone later because the two strands of ssDNA are unlikely to re-anneal perfectly back to their complementary strand in a pool of diverse molecules upon cooling. This, thus, reduces the true # of ligatable inserts and, consequently, our cloning efficiency. We therefore switch to using FastDigest Esp3I from Invitrogen with an optimal reaction temp. of 37C.
Digestion of insert library with FastDigest Esp3I (Invitrogen)
40 uL of amplified library (40 ng/uL) ———> 1.6 ug total to digest (I’m saving a small amount as backup)
+ 5 uL of FastDigest buffer (10x)
+ 0.5 uL of 100 mM DTT (FastDigest Esp3I calls for 1 uL of 20 mM DTT in 20 uL rxn)
+ 5 uL Esp3I enzyme
Once all components added, mix gently by pipetting
37C for 1 hr (no shaking).
Omit heat-inactivation step
Add 50 uL dH2O to 50 ul digestion rxn for a total volume = 100 uL
I find diluting the digestion rxn here helps increase recovery & improve final purity of the purification step
Purify the digested DNA using Zymo’s Oligo Clean & Concentrator kit, dividing across n=2 columns (for balancing)
Why not use IsoSpri here? You could, altho I’ve found it struggles to separate the DNA from Esp3I leading to lower recoveries
If you don’t have this kit, I recommend a 50% IsoSpri (1X Spri-to-sample ratio with 50% of isopropanol final concentration by vol.)
Elute in 2x21 uL dH2O, pool together for a total of 40 uL, measure by Nanodrop
Purified, digested library) 20 ng/uL (1.9/1.6) ———*40uL———> 800 ng (50% recovery… not great not terrible)
If DNA quality is low (e.g. 260/230 < 1.5), repeat column purification once more.
I think something in the Esp3I rxn (the RE or a component of the buffer) likes to stick to the DNA….
Confirm digestion by running aliquot on 4% agarose gel or 10% polyacrylamide TBE-gel, 180V for 30-40 min then stain 10 min w/ 1x SybrGold (see below for protocol)
Suppliers generally call for 1 uL of RE per 20-50uL rxn to digest 1 ug of DNA so why apply the Esp3I enzyme in such excess? B/c I’ve found that Esp3I does not act very efficiently on short dsDNA (e.g. PCR products). I’ve tried different incubation times (e.g. overnight) in hopes of compensating for the lower activity, however, this doesn’t really lead to any further digestion suggestion the RE acts with single-turnover kinetics. Compensating for all of this, I’ve found a 50 uL rxn containing 5 uL of enzyme, when incubated at 37C for 60 min, does a pretty good job (50-100% efficient) of digesting 1-2 ug of short dsDNA.Invitrogen seems to admit to the weird behavior in their manual for FastDigest Esp3I, which I admittedly did not read until after a bunch of troubleshooting…

Pre-cast Novex 10% polyacrylamide TBE gel (see below for details)
Invitrogen’s instructions suggest Esp3I acts ~20% as efficiently on short dsDNA (“PCR products”) than other, longer substrates
Precise purification of short DNA fragments (i.e. the final insert library)
Moving right along, we now need to purify the 25bp digested fragments (spacers w/ sticky ends) we just generated. What would happen if we didn’t and proceeded directly into the ligation step using the crude digestion product? Well, actually, the ligation would still work; only the correct, double-digested inserts would properly seal the backbone and produce re-circularized plasmid. Other fragments (digestion byproducts) could ligate back to the insert or even to the backbone (imperfectly), however, any of these unintended ligations would fail to produce fully re-circularized backbone and thus wouldn’t expand in our bacterial host once we transform the ligation product into E. coli. However, the risk of including these undesired fragments in the ligation is that they block our intended insertion event and thus reduce overall insertion efficiency, so it’s best to just remove anything that’s not exactly what we want beforehand.
There are 2 different ways that I’ve used to purify the final inserts (spacers w/ stick ends). IsoSpri doesn’t work b/c it would purify everything in the digested product. You could potentially do a “double-sided” IsoSpri to bind/remove the larger fragments before purifying the final, smallest fragment however in practice this doesn’t work well as the selection window isn’t that tight. Alternatively, I’ve had success with:
(polyacrylamide) gel extraction
biotinylated byproduct removal (i.e. immobilization using streptavidin-conjugated magnetic beads)
I’ll share both protocols so you can choose which one you like better.
Option #1: Final insert library purification by (polyacrylamide) gel extraction
Run 100-200 ng of purified, digested library per lane on 10% polyacrylamide TBE gel
Prepare 500 mL of 1X TBE buffer then warm by microwaving in glass beaker for 1-2 min
Prepare gel tank by loading 10% TBE gel and submerging in 450 mL of warm 1x TBE buffer. Flush wells w/ buffer using P200.
Prepare samples
Aliquot 10 uL of digested library (20ng/uL) to strip tube + 2 uL of NEB loading dye (6x) … x4 replicates
Aliquot 1 uL of 10bp ladder (O’RangeRuler, 1x) to strip tube + 9 uL dH2O + 2 uL of NEB loading dye (6x)
Vortex to mix then spin down to collect liquid at bottom of tubes
Load samples, 12 uL / lane
Run gel at 180V for ~30 min then stain with 1X SybrGold for 10-20 min
While waiting for gel, prepare for next step by punching hole in bottom of 0.5 mL tubes w/ 18g needle then placing tube in larger, 1.5 mL eppy tube (n=4)

10% polyacrylamide TBE gel pre-extraction


View/image gel on blue light transilluminator
Carefully cut out bottom (25bp) band from each lane, placing gel slices in separate 0.5 mL tubes w/ bottom punctured
With gel slices in 0.5 mL tubes placed in larger 1.5 mL tubes, spin 18,000xg for 1 min so gel is crushed through small hole and transfers into bottom tube. Confirm all gel has been pushed through otherwise spin again @ 21,000xg for 2 min
Remove & discard 0.5 mL tubes. Add 300 uL of 1X TE buffer (10 mM Tris-HCl, 1 mM EDTA, pH=8) to each crushed gel sample. Vortex to mix.
Incubate crushed gels in buffer* O/N at 4C or 10C with agitation (e.g. ThermoMixer set to 1400 rpm) to elute DNA
Once DNA is eluted, spin crushed+soaked gel samples 18,000xg for 5 min to pellet gel
Alternatively, you can load gel slush in Ambion spin column and centrifuge to remove gel fragments (saving the flowthrough)
Carefully, without disturbing pelleted gel fragments, transfer 250 uL of supernatant / sample to new tubes (n=4)
Purify eluate by 50% IsoSpri (or isoprop. precipitation which I’ve always found slow & tedious, especially for low conc. DNA)
Add 250 uL Spri beads / sample (i.e. 1x Spri-to-sample ratio by vol.)
Add 500 uL of isopropanol / sample (i.e. final concentration of 50% isopropanol by vol.)
Vortex to mix then incubate RT for 5-10 min
Apply to magnet for 5-10 min
Wash beads on magnet 2x with 85% EtOH
Remove any residual liquid and dry beads on magnet for 5 min
Elute DNA by adding 21 uL dH2O per tube. Pool 20 uL of eluate / tube together for a total of 80 uL
Measure final DNA concentration by Qubit (dsDNA HS D1000 kit) as Nanodrop isn’t sensitive enough to pick up
Final, purified insert library) 1 ng/uL ——*80uL——> 80 ng total recovered (50% recovery)
Estimated recovery is based on 800 ng input and the fact that our final inserts comprise only ~20% of the original DNA fragment by length/mass
Confirm 25bp insert was purified by running 20 uL of final sample on 4% agarose gel
As you can see from the 4% agarose gel on the right (lanes #1-2 contain technical replicates), the final insert library is very clean (single band) after gel extraction altho it appears to be running a little slowly compared to the 10bp ladder for some reason.
10% polyacrylamide TBE gel post-extraction
Final, purified insert library run on 4% agarose gel
*UPDATE: I think the small dsDNA (25-35bp) is especially susceptible to melting apart during the soak step of the crush-and-soak due to a lack of cations in the elution buffer (which keep the negatively-charged backbones from repelling one another) so it might help to spike in 10% (by volume) of 3M sodium acetate (common reagent for ethanol precipitation) or 3-5M NaCl.
I tried this more recently, followed by O/N incubation at 20C, but didn’t notice too much of a difference (still achieved ~50% recovery and DNA was more smeary on gel after IsoSpri cleanup)
Comparing to other protocols…
As I mentioned above, you could alternatively purify the gel extracted & eluted DNA by ethanol or isopropanol precipitation however it’s tedious (long incubation times, extreme centrifugation steps, have to maintain cold temp. throughout protocol, and precipitated DNA is hard to see / easy to lose during washes). I also never liked the disparity between reported yields of this purification technique between measurement methods (Nanodrop vs. Qubit). Here is the Weissman lab’s protocol, note their italicized comment at the end. The Qubit values are 10-fold less than Nanodrop estimates. I think the high 230nm absorption by Nanodrop distorts its mass estimate and has to do w/ the size of the DNA as I have found really short nucleic acid fragments produce weird absorbance spectra for reasons I’m still speculating… Based on these observations though, I do agree with their decision to default to the Qubit estimate which is more realistic based on their input & its method of detection. Also note that you can either add 0.6 mL of 100% EtOH or 0.2 mL of 100% isopropanol. I think ethanol (w/ glycoblue) is best for very short (<50bp) DNA.

From https://weissman.wi.mit.edu/resources/Pooled_CRISPR_Library_Cloning.pdf
Option #2: Immobilization of digestion byproducts using streptavidin-conjugated paramagnetic beads (i.e. final insert purification)
So you might have noticed back in “PCR0” that I specified/suggested using 5’ biotinylated primers. This is an optional modification that enables quick and simple purification of the final inserts after digestion thanks to the existence of “streptavidin beads”: magnetic beads with streptavidin protein conjugated to the surface. The streptavidin-biotin interaction is one of the strongest and most specific non-covalent interactions found in nature - a trait that we often take advantage of in molecular biology to ”pull out” / purify specific things (molecules or cells).
Specifically, I’m going to use streptavidin dynabeads from Invitrogen. They have a few different kinds that vary by bead diameter (1 um vs. 2.8 um), binding capacity, and storage buffer but in theory any of them should work for this application - I’m going to use MyOne streptavidin T1 beads b/c they’re smaller and, therefore, have a higher binding capacity.
After PCR0 w/ biotinylated primers, most DNA molecules in the amplified library should have a biotin group on their 5’ end. Double digestion w. Esp3I will produce a final insert with no biotin groups whereas every other byproduct will still contain a 5’ biotin. Therefore, treatment w/ strepatividin beads will remove all byproducts leaving only the double-digested final inserts behind in solution. It’s essentially a Spri purification except we have streptavidin on the beads instead of exposed carboxyl groups and we want to save the non-bound DNA in the eluate after applying a magnetic field to collect the beads on the side of a tube.

Final insert library purification using streptavidin beads
Prepare 2X nucleic acid binding & washing (B&W) buffer
10 mM Tris-HCl (pH=7.5), 1 mM EDTA, 2M NaCl
Prepare MyOne streptavidin T1 dynabeads
Mix thoroughly by vortexing for 15-30s
Aliquot 50 uL of beads to microfuge tube (100 uL will bind 20 ug of dsDNA)
Add 1 mL of 1X B&W buffer and vortex to mix
Apply to magnet for 1 min then discard supernatant
Repeat wash steps 2x for a total of n=3 washes
Re-suspend washed beads in 100 uL of 2X B&W buffer
Immobilize biotinylated DNA fragments
Add 100 uL of digested DNA (diluting up to this total vol. with dH2O) to beads
Incubate 10-15 min at room temp. with gentle mixing (e.g. 1000 rpm on shaker)
Apply to magnet for 3-5 min
Carefully, transfer supernatant (~195 uL) to new tube
Purify non-bound DNA by IsoSpri
Add 200 uL SpriSelect beads to collected eluate (containing non-biotinylated DNA)
Add 400 uL of isopropanol
Vortex to mix then incubate 5-10 min at RT
Apply to magnet for 5 min
Wash magnetized beads 2x with 85% EtOH
Dry beads by spinning down, re-apply magnet, remove any residual liquid
Add 44 uL of dH2O to dried beads to elute DNA, vortex to mix, re-apply magnet
Transfer 41 uL of eluate to new tube and measure by Qubit
Purified inserts) 2 ng/uL ——*40 uL——> 80 ng total (~50% recovery)
Estimated recovery is based on 800 ng input and the fact that our final inserts comprise only ~20% of the original DNA fragment by length/mass
Confirm insert purity on 4% agarose gel and/or 10% polyacryamide (TBE) gel
Here, we used a test library of 90bp oligos containing 30bp adaptors so single-cut fragments are 60bp and the fully digested product is ~30bp (bottom band). Only when we use biotinylated primers in the PCR do we get pure 30bp fragments in the eluate after treatment of digested product with streptavidin dynabeads. Results from Yanna, an amazing undergrad in the lab.

***Not entirely sure why anything eluted in lane 3 (most likely explanation is that we over-saturated the beads with biotinylated product) but see secondary confirmation of insert purification using streptavidin dynabeads, below
Here’s our actual library, digested w/ Esp3I, before and after purification of the 25bp insert using streptavidin dynabeads. In the left lane of each gel is a 10bp ladder

Strong enrichment of final inserts
Ligation!
Great, we FINALLY have all the pieces we need to create the cloned plasmid library. The # of ligation rxns to perform here depends on how big your library is (how many unique oligo designs you’re inserting into the backbone). You can estimate this based on the # of molecules you’re inputting into each rxn, the coverage you’re trying to maintain (typically > 1000x per oligo), and the efficiency of your ligation rxn, which I’ll talk about in a bit. Typically, I’ll perform an excessive amount of ligation rxns just to be safe, so the protocol below is for setting up 10 rxns for a n=310 oligo library. Adjust accordingly. Also, the backbone-to-insert (molar) ratio is another important consideration of the ligation rxn. I find 1:1 or 1:2 is sufficient, any more and you’re just wasting material. You do want to make sure you have accurately quantified both purified inputs (backbone and insert DNA) for this though, otherwise your target ratio will be off.

… but how efficient was our ligation reaction?

Again, this expt. was performed by our wonderful undergrad, Yanna.
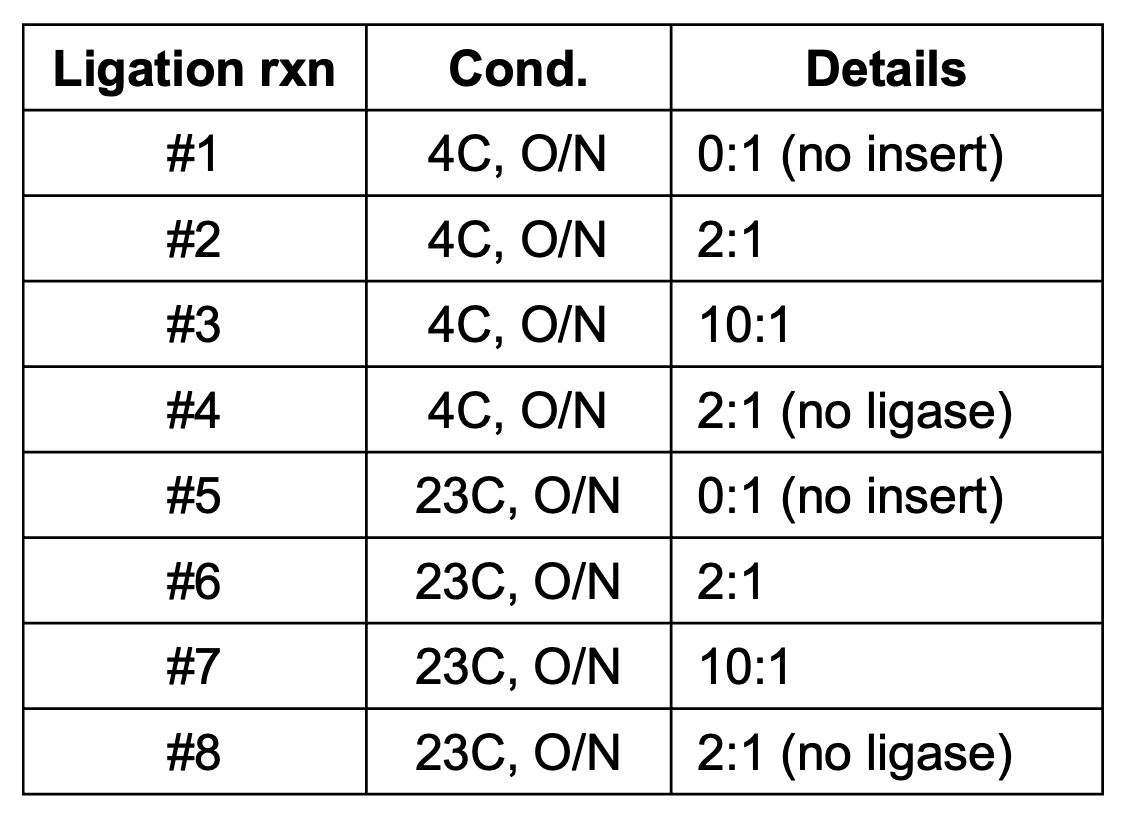
Secondary confirmation of ligation product by 0.6% agarose gel, these ligation rxns were run for 12 hours (overnight) at different temps. and then purified… “0:1”, “2:1” and “10:1” indicate the insert:backbone (molar) ratio in the ligation rxn.
Combine reagents in a single 1.5 mL tube, adding the enzyme last
Gently mix the reaction by pipetting up and down and spin down briefly.
Incubate at 4-10°C overnight
Skip heat inactivation. Instead, purify DNA by 0.6x Spri
Add 120 uL Spri to 200 uL ligation rxn. Vortex to mix then incubate room temp. for 5 min
Apply to magnet for 5 min, remove sup. and wash beads on magnet 2x with 75% EtOH
Dry beads by spinning down to collect residual liquid then re-applying to magnet and discarding liquid at bottom.
Elute DNA by adding 55 uL dH2O to beads. Vortex to mix and re-apply to magnet. Transfer 52 uL of final product to new, labeled tube. Measure by Nanodrop.
Purified ligation product: 25 ng/uL (1.9/2.2) —*55uL—>1.4 ug (80% recovery)
Envisioning our ligation reaction at the molecular level, we just mixed a bunch of tiny (25bp), wiggly inserts with long (13kb), spaghetti backbones and hoped that some copies of these two things found each other in a sea of solution at a good angle for hybridization to occur. We then hoped that this very unstable, hydrogen bond based interaction (supported by a measly 4bp of complementarity) held together long enough for a protein (ligase) to come along, recognize it’s preferred substate (5’-phosphate adjacent to 3’-OH), and covalently seal the two molecules together not just once but twice (top & bottom strands) to create a sealed end. Then, we hope that all these events happen AGAIN at the other end of the molecule to create the final sealed circular construct. What are the chances these seemingly unlikely events happened over & over again, inserting and re-circularizing all of our input DNA? In other words, what was the frequency of successful insertion in our rxn i.e. our “ligation efficiency”? Good question. There are a couple ways to find out…
Note: not all 4 ligation events need to happen for an assembled construct to propagate in E. coli, a minimum of 2 (or 1?) could potentially lead to propagation inside the cell as the bacteria are able to fix nicked DNA themselves, however, I like to think about it this way b/c this is truly what we’re aiming for (complete re-circularization) and I’m okay UNDERestimating my product formation efficiency but I’m not okay overestimating it
We could directly transform our purified ligation product into E. coli and plate some of these cells to estimate the total # of transformants based on colony counts, however, this is an indirect way of estimating ligation efficiency since it relies on the assumption that the transformation worked perfectly and every available construct in our ligation rxn was taken up by a cell and propagated. This is not a good assumption. Instead, we should test ligation efficiency more directly on the purified rxn product before proceeding into the transformation step by…
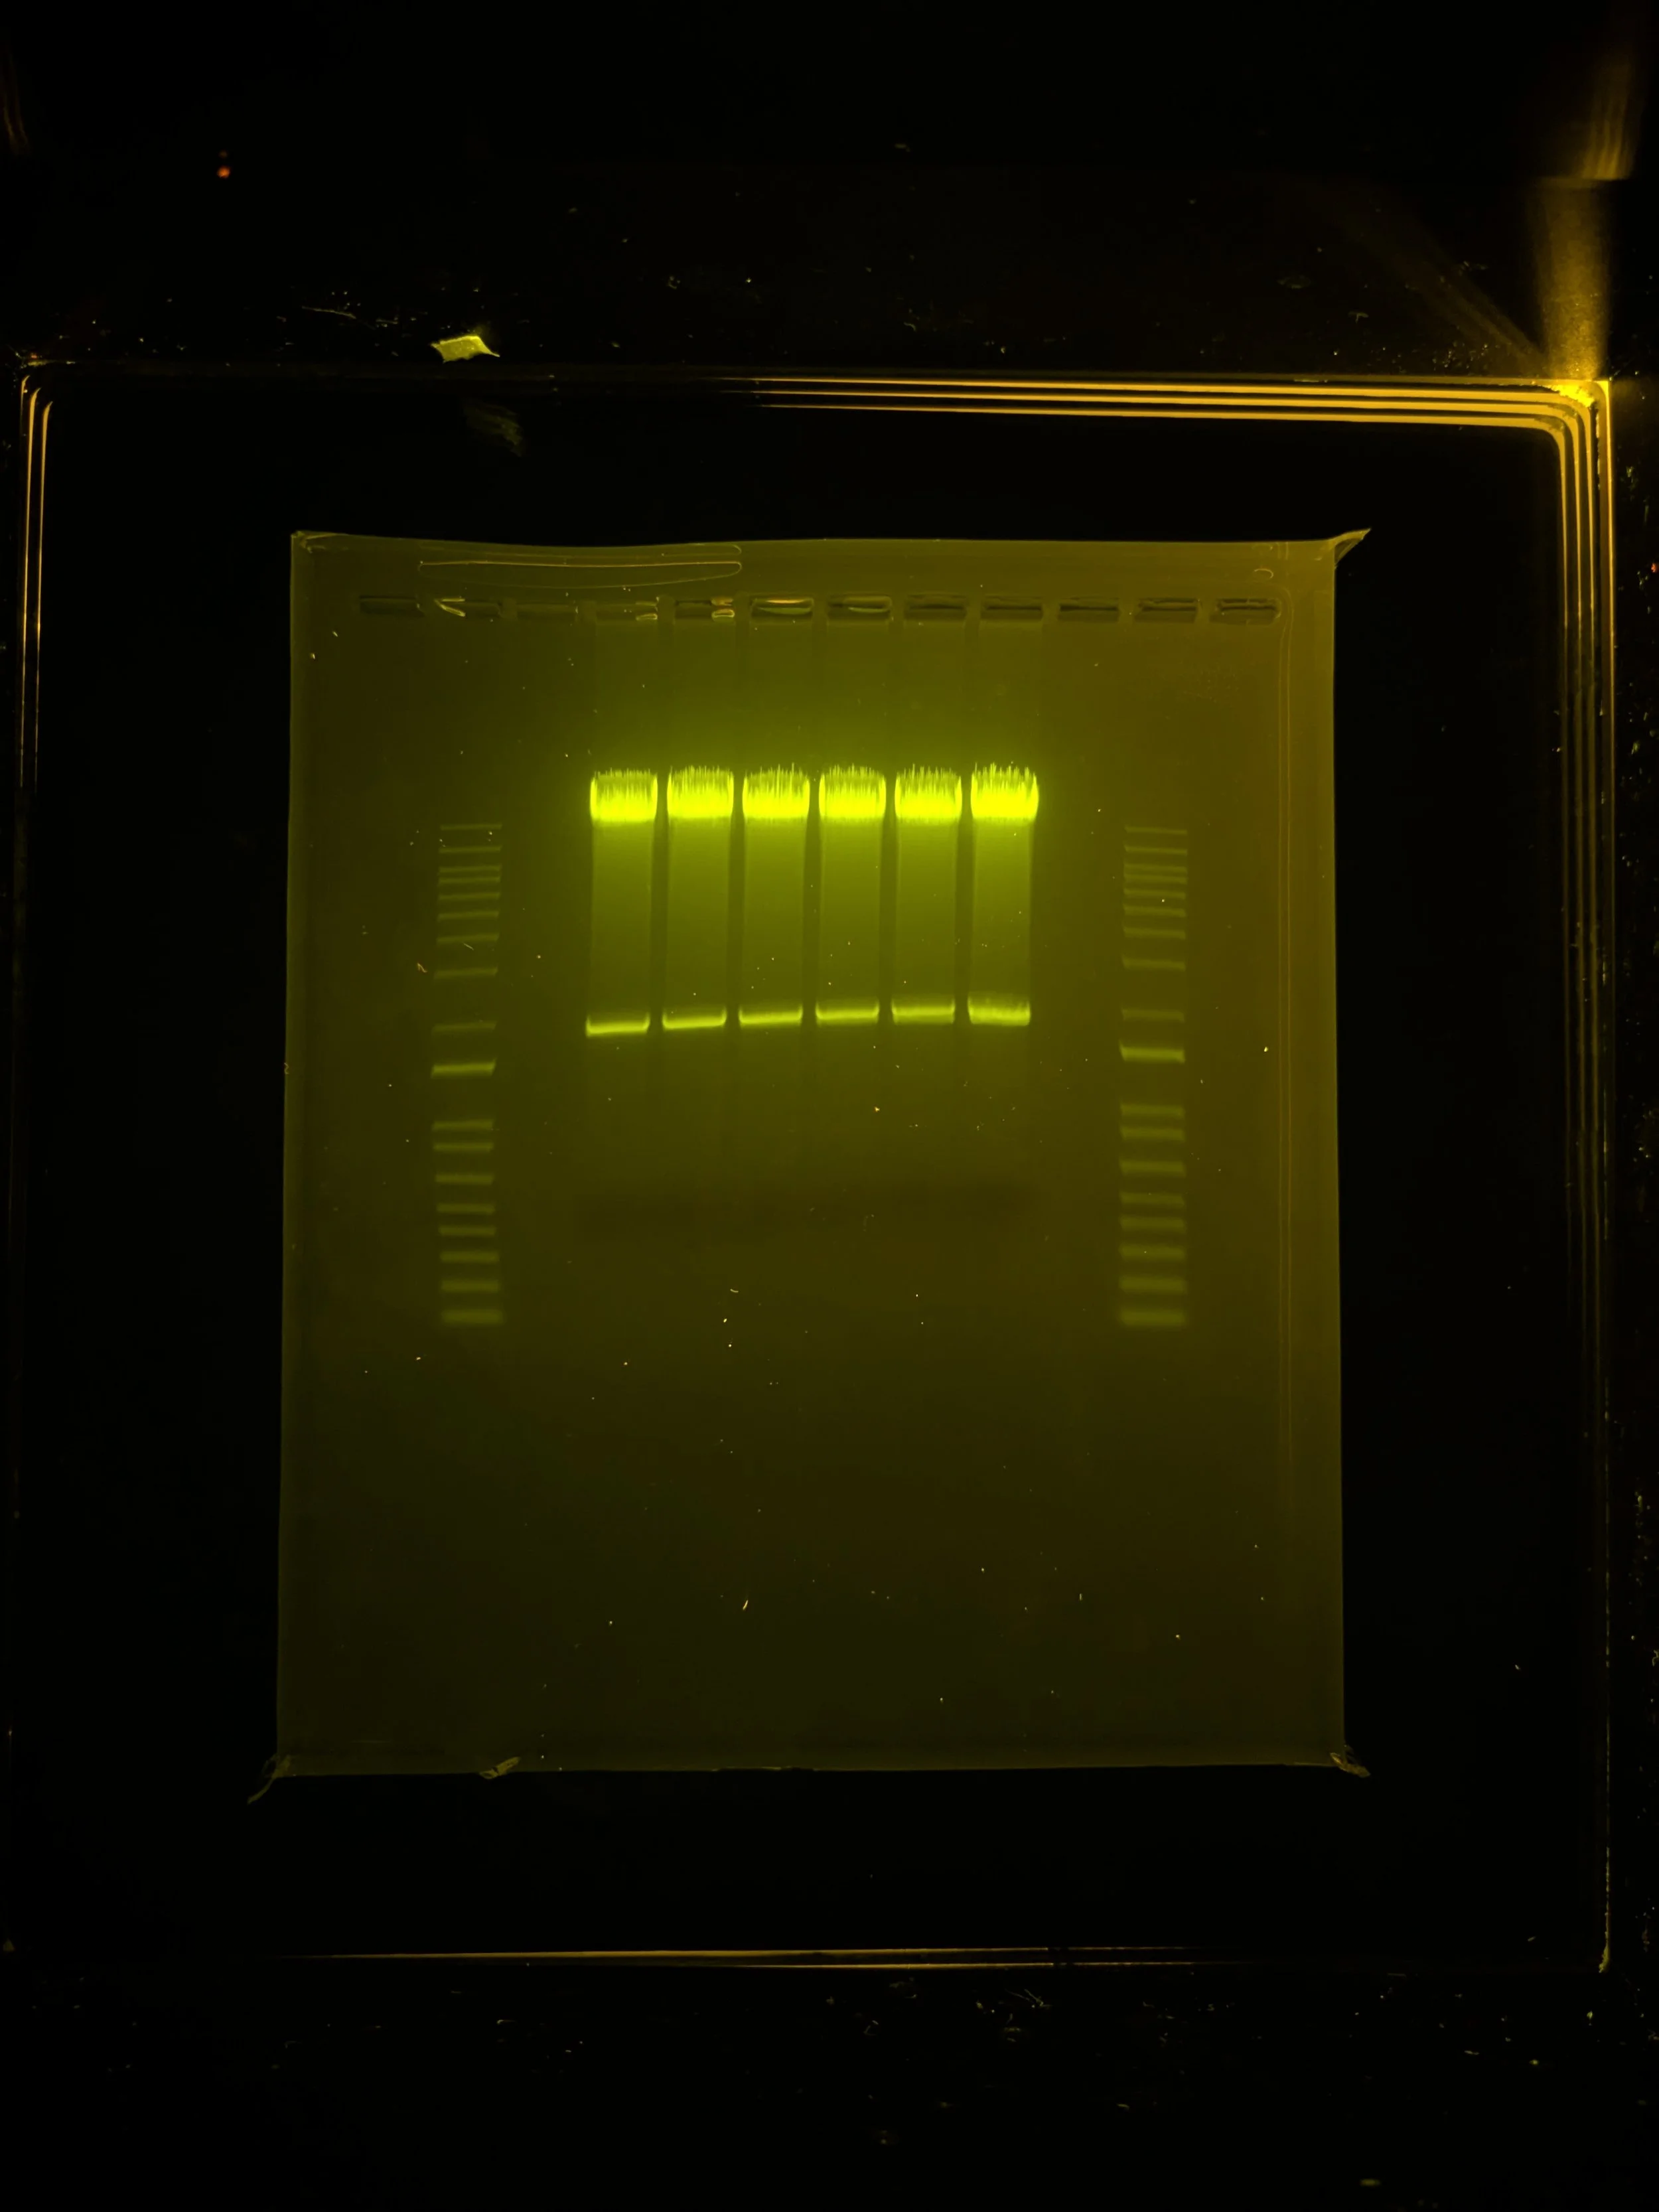
Visualizing on a gel with proper controls
Treating w/ T5 exonuclease & re-purifying
Option 1 is the easiest, just take a small aliquot of purified ligation product and run on a 0.5-0.7% agarose gel, including a lane of purified backbone (BsmBI digested & gel extracted lntCRv2) and a lane of undigested backbone (lntCRv2 plasmid) as controls. I usually load 50-100 ng of DNA per lane and run this low-percentage agarose gel 50-100V for 1-2 hours.
Outside lanes: 1kb Plus ladder (Invitrogen) - top band marks 15kb
Middle left lane: Digested & gel-extracted lntCRv2 backbone
Middle middle lane: Ligation rxn product (digested lntCRv2 backbone + purified inserts, incubated RT for 10 min w/ T4 ligase)
Middle right lane: lntCRv2 plasmid (undigested i.e. circular)
As you can see from the small band appearing in the middle middle lane at a similar height as the undigested (circular) lntCRv2 plasmid, the ligation appears to have worked for a small amount of the total DNA in the reaction. Hard to estimate efficiency based on band intensity but I would guess 1-10% of our vector was re-circularized (presumably w/ insert… will confirm by sequencing later)
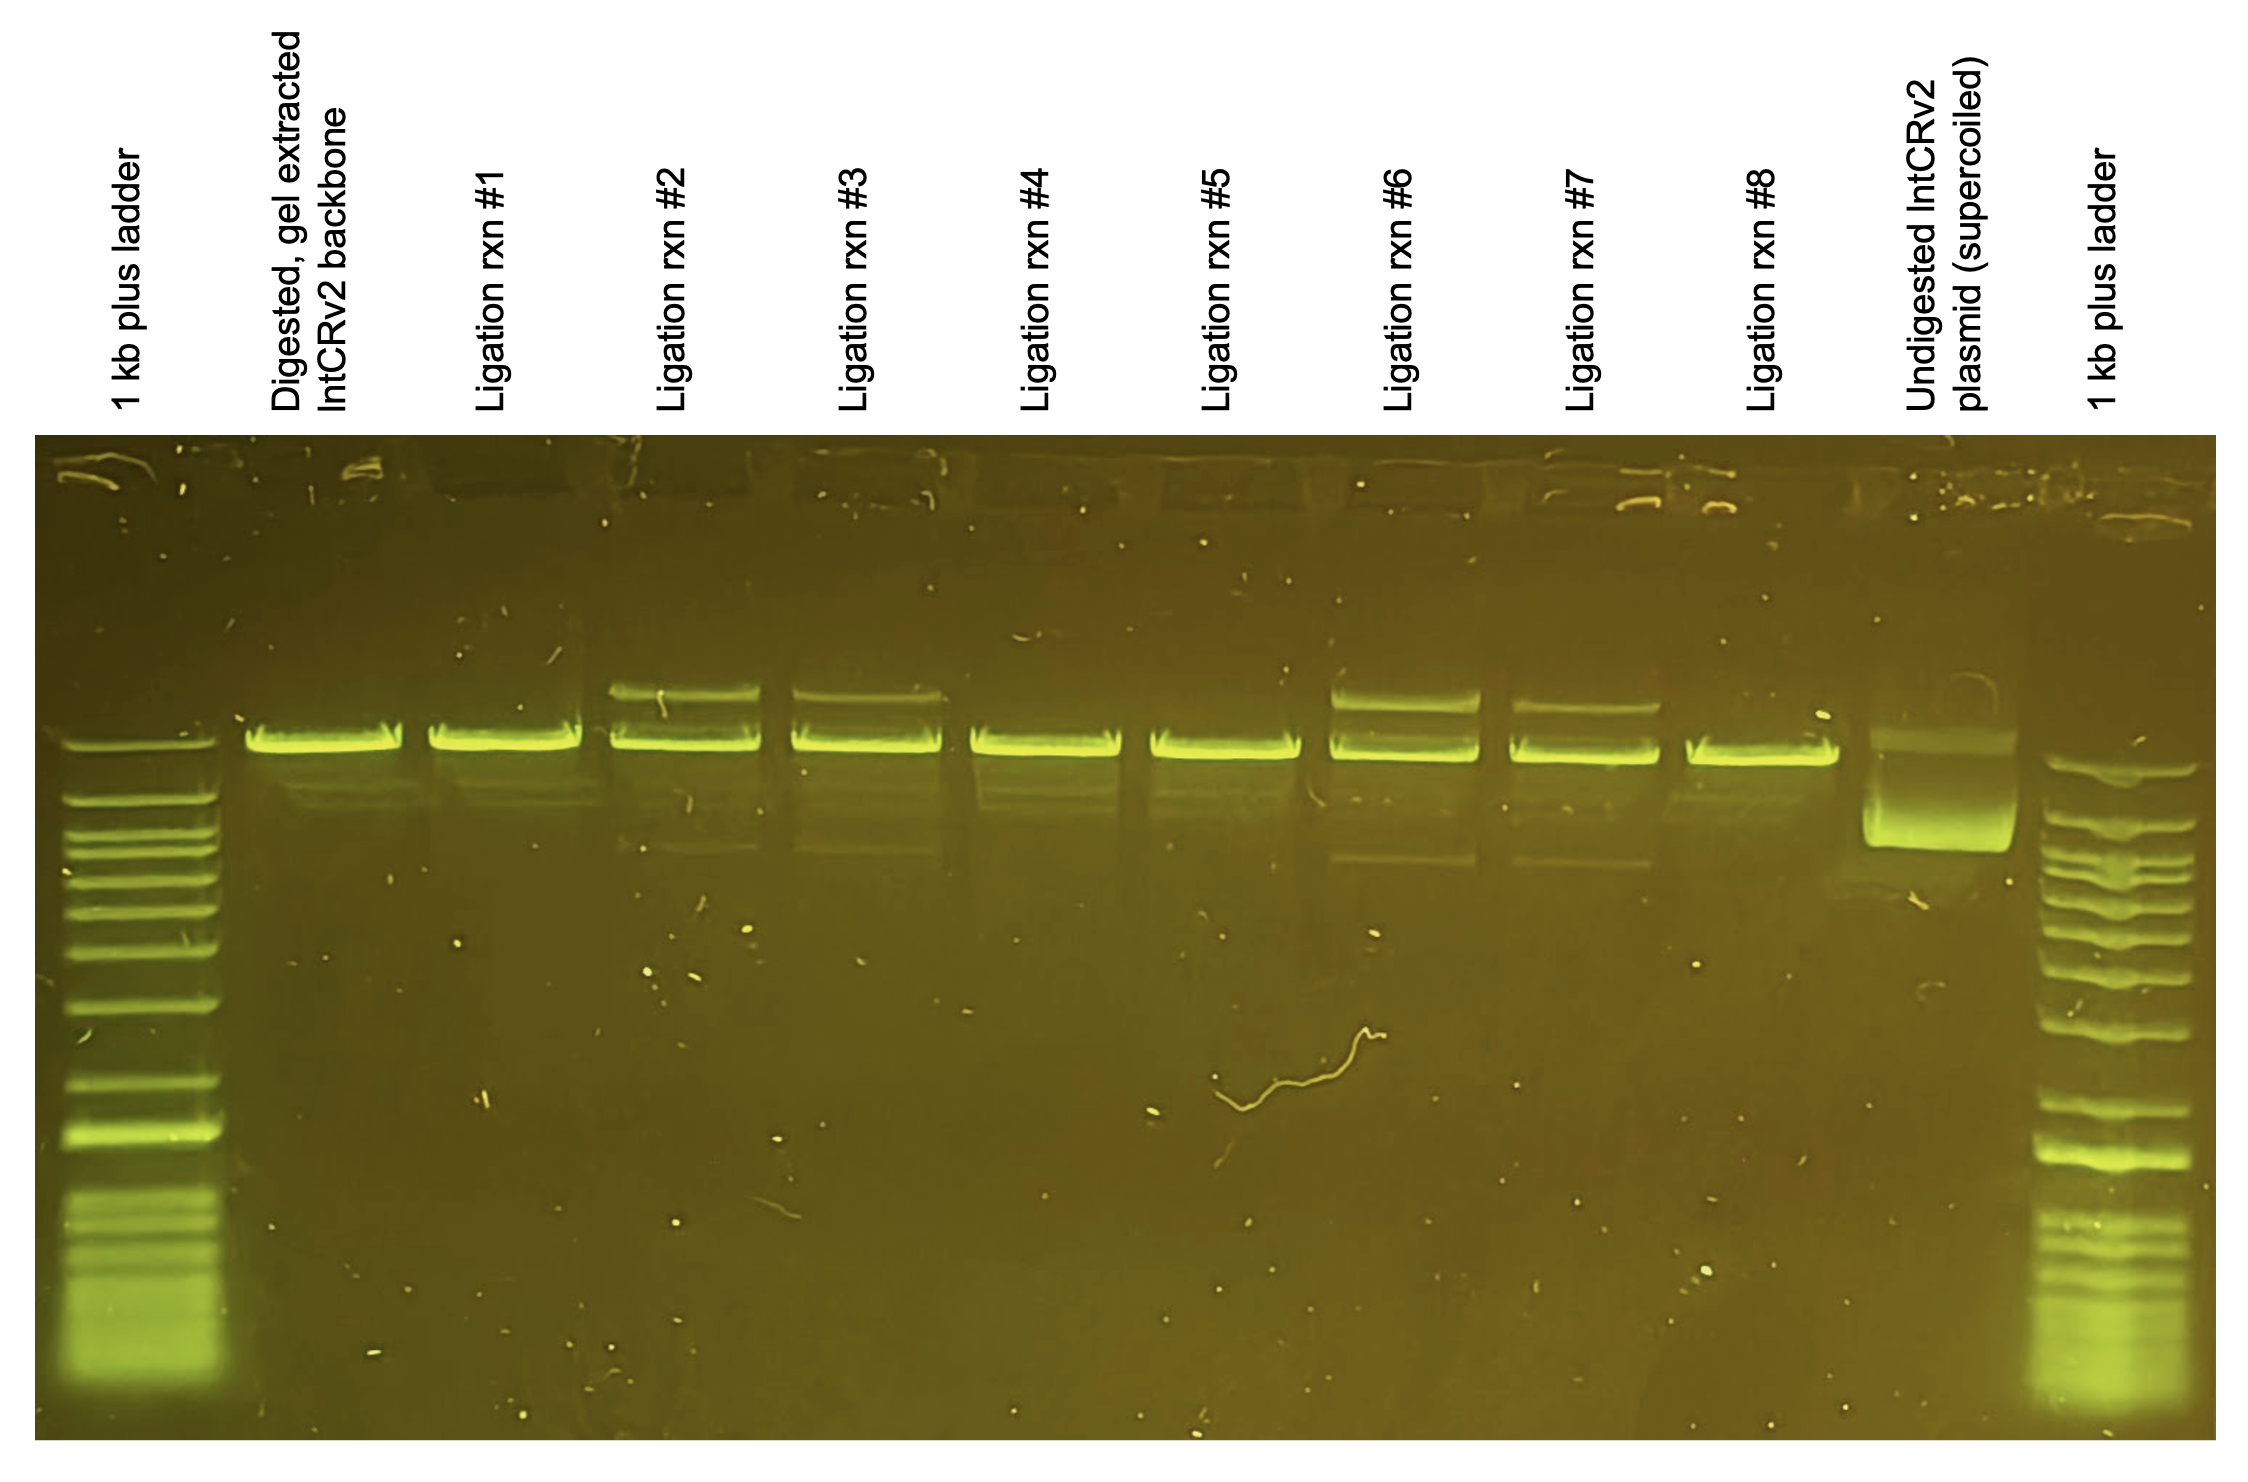
Notice how only when all necessary components are present (rxns #2-3, #6-7) do we see new bands appear above and below the primary band (linearized backbone). These indicate our ligation product. Why two bands? I think it represents assembled plasmid that is nicked/relaxed (above) vs. supercoiled (below) similar to the undigested lntCRv2 plasmid control on the right.
Option 2 is admittedly me trying to be clever and probably overkill but, again, I would really like to know how successful we were in forming our final, desired constructs (lntCRv2 w/ inserted spacers). Also, I want to know if enough product was successfully formed to ensure we maintained our library coverage (>1000 molecular events per spacer) through the ligation step.
If you explore your options of commercially available exonucleases (NEB offers a great “Exo Selector” tool), you might notice that only one of them, T5 exonuclease, degrades every single possible DNA construct (linear ssDNA, circular ssDNA, linear dsDNA, nicked circular dsDNA) EXCEPT for unnicked, perfectly circular dsDNA which happens to be our desired product. Therefore, if we treat our purified ligation rxn product with T5 exonuclease, it should chew up anything that isn’t the final desired constructs and these chewed up fragments can then be removed by a simple, low Spri-to-sample ratio (0.6x) purification of the exonuclease rxn leaving only our final, sealed plasmids in solution. We can then measure the DNA content of this exonuclease treated sample by Nanodrop / Qubit and compare to untreated ligation product. Here’s my protocol & results:
T5 exonuclease treatment to estimate ligation efficiency
Aliquot 50 uL of purified ligation product (25 ng/uL) to new tube
Note, for this experiment I incubated the ligation rxn overnight (12 hr) at room temp. before purifying the product (NEB recommends room temp. for 10 min)
Add 40 uL dH2O
Add 10 uL of NEBuffer 4 (10x)
Vortex briefly to mix then spin down. Aliquot 2x50 uL of master mix to separate strip tubes
25 ng/uL * 50 uL / 2 rxns = 625 ng of ligation product per rxn sample
Label one rxn sample “+T5 Exo” and one rxn sample “-T5 Exo”
Add 1 uL of T5 exonuclease enzyme (NEB) to rxn sample labeled “+T5 Exo”. Add nothing (or 1 uL dH2O) to rxn sample labeled “-T5 Exo”
Vortex rxns briefly and spin down. Incubate 37C for 30 min.
Add 1.5 uL of 500 mM EDTA per rxn to quench/stop
Per rxn, add 50 uL dH2O to bring total volume to 100 uL then purify by 0.6X SpriSelect. Elute DNA in 11 uL dH2O (a little tricky, can use a larger volume if needed).
Transfer 10 uL of eluted DNA to new tubes and measure DNA conc. by Qubit HS dsDNA assay (e.g. 3 uL sample + 197 uL of 1x Qubit buffer). Include dH2O sample as negative control.
dH2O) below limit of detection
“+T5 Exo” rxn product) 0.3 ng/uL ——*11 uL——> 3.3 ng recovered (<1% of input)
“-T5 Exo” rxn product) 30 ng/uL ——*11 uL——> 330 ng recovered (~50% of input… not a great recovery for the control but oh well, sets a baseline)
Wow, so only 1% of the DNA remains after T5 exo treatment meaning only 1% of the ligation product is perfectly sealed, circular dsDNA (lntCRv2 backbone + 25bp spacer insert). This agrees with our observations from running the ligation product on a gel and confirms the ligation rxn is only ~1% efficient. Is this enough? Let’s see…

As predicted, running 10 ligation rxns was overkill, as even w/ an observed 1% efficiency we more than maintained coverage of our library through the ligation step yielding, on average, 4 million assembled molecules per unique construct.
Transformation
Now that we have our assembled constructs (cloned plasmid library), we need to transform them into competent E. coli in order to expand the pool (increase the total amount of plasmid). As you saw in the last section (re: T5 exo treatment), we only have 1-10 nanograms (ng) of true, fully circularized plasmid product after the ligation step which is not enough for packaging into lentivirus (we typically use 10-100 micrograms (ug) of plasmid to transfect enough cells to produce enough lentivirus for our experiments) thus necessitating this intermediate step.
Why not just scale up our ligation step further so we can bypass transformation? B/c we need ~10,000x more plasmid for the lentivirus packaging step… that amount of ligation would be infeasible financially & technically whereas plasmdi propagation by E. coli is quick, easy, and dirt cheap.
We’d ideally like our transformation to be as efficient as possible, again to maintain coverage of our library and to minimize the total # of transformation rxns we need to do, therefore we will be using electrocompetent E. coli which typically achieve efficiencies of >1e10 CFUs/ug of plasmid compared to chemically competent cells which only return >1e7 CFUs/ug of plasmid.
I’ll be using Endura DUOs electrocompetent cells since they’re highly efficient and use a strain of E. coli (recA13 supE44 ara-14 galK2 lacY1 proA2 rpsL20(StrR) xyl-5 λ– leu mtl-1 F– mcrB mrr hsdS20(rB–, mB–)… if that means anything to you) engineered to be able to carry/expand plasmids with repetitive sequences (e.g. lentiviral vectors containing LTR direct repeats) with minimal recombination. They’ve also been proven to work well with CRISPR libraries. Each vial contains 50 uL of cells which can be split into 2x25 uL transformation rxns (hence the “DUO” name), however, we will consider all 50 uL in each vial as one reaction to simplify our workflow.
Transformation of assembled CRISPR library into Endura electrocompetent cells
Thaw 1 vial (12 mL) of Endura recovery media (cat no. 80026-1) to room temp.
You can warm to 37C in an incubator / water bath to speed things along, I haven’t noticed any difference in yield using recovery media at 37C vs. room temp.
Thaw 2 vials of Endura DUOs electrocompetent cells (50 uL / vial) on ice for 10-20 min. Label lids e.g. “1” and “2”
Thaw pUC19 control plasmid (10 pg/uL) provided with Endura cells. Vortex to mix & spin down briefly.
I highly recommend including this positive control alongside the CRISPR library to confirm that the transformation step worked as expected.
While waiting for cells to thaw, chill 2x0.1cm electrocuvettes (i.e. 1 mm electrocuvettes) by placing on ice. Label lids e.g. “1” and “2”
Prepare 2x15 mL U-bottom culture tubes by labeling accordingly (e.g. “1: CRISPR library” and “2: pUC19 control”)
Ensure purified ligation product (untreated or treated with T5 exonuclease) is thawed and quantified
I’ll be using the original, purified ligation product (untreated w/ T5 Exo) which is at a total DNA conc. = 25 ng/uL, however, we know that only ~1% of that is our truly assembled constructs
This means that a lot of the DNA taken up by cells will fail to propagate as it’s just our linearized lntCRv2 backbone. This is fine but if it makes you uncomfortable you can certainly T5 Exo treat and purify the ligation product before transformation. Only downside is you’ll be removing any nicked constructs representing ligated but not fully sealed backbone+insert assemblies which may still transform/propagate in our electrocompetent cells
Add 4 uL of purified ligation product (25 ng/uL) to 50 uL of thawed electrocompetent cells (vial #1). Mix by stirring cells gently w/ pipette. Quickly return to ice.
Each 50 uL of cells can tolerate up to ~300 ng of total DNA added and <10% of a volumetric dilution. Ideally, you don’t want to exceed 200 ng DNA / 50 uL of cells or >10% of total volume (5 uL of DNA soln.).
4 uL * 25 ng/uL * 0.01 ligation efficiency = 1 ng of fully assembled (backbone w/ insert) plasmid constructs = 0.12 fmol = 70 million assembled molecules / 310 unique constructs ~= 225,000 molecules / construct
Add 2 uL of pUC19 control plasmid (10 pg/uL) to 50 uL of thawed electrocompetent cells (vial #2). Mix by stirring cells gently w/ pipette. Quickly return to ice.
pUC19 plasmid is 2,686 bp so 20 pg total is equivalent to 0.01 fmol or ~7 million molecules
Transfer 50 uL of cell+DNA soln. from vial #1 to cuvette #1, pipetting gently in between metal plates. Flick cuvette downwards quickly to settle cells at bottom. Quickly return to ice.
Transfer 50 uL of cell+DNA soln. from vial #2 to cuvette #2, pipetting gently in between metal plates. Flick cuvette downwards quickly to settle cells at bottom. Quickly return to ice.
Have recovery media (thawed), culture tubes (labeled), electroporation cuvettes (loaded w/ cells+DNA) on ice, and P1000 pipette with tips all ready to go, then…
Proceed to electroporate cells
Set GenePulser program to optimal settings (10 uF, 600 Ohms, 1800 Volts, exponential decay)
Load cuvette #1 into GenePulser system and press “Pulse”.
Immediately (within 10s) add 1 mL of recovery medium to pulsed cuvette and pipette gently up & down 3x then transfer electroporated cells to corresponding culture tube
Again, add 1 mL of recovery medium to same pulsed cuvette, pipette gently up & down 3x, then transfer diluted cells to corresponding culture tube (now 2 mL total)
Record time constant & achieved voltage reported by GenePulser instrument.
Time constant should be between 3.5 - 5.0 msec and voltage delivered between 1780-1810V. If the instrument instead returned “error” or “arc” warnings, the sample should be considered a failure and tossed.
Repeat process for cuvette #2
Culture transformed cells 1hr at 37C with rotation (200-250 rpm)
This is an initial recovery stage to give cells time to repair their membrane and start expressing the antibiotic resistance protein (beta-lactamase aka “bla”) encoded within the uptaken plasmid
While waiting, warm 4 agarose plates of LB+carbenicillin (100 ug/mL) to room temp.
Also while waiting, aliquot 110mL of LB+carbenicillin (100 ug/mL) into a 1L baffled flask (a 500 mL flask is also fine). Seal tightly and leave out to warm to room temp.
After 1 hr, dilute 1 uL of transformed cells into 1000 uL of recovery media in labeled microfuge tubes. Vortex to mix and set these tubes aside for plating.
Alternatively, can dilute 10 uL into 990 uL of recovery media
Dilute the remaining volume of cells transformed with our CRISPR library (~2 mL) into the 1L flask preloaded with 110 mL of LB+carb
We are not going to expand the cells transformed with pUC19 as there’s no point, we only want to plate a small amount of the 1:1000 dilution to evaluate the success/efficiency of our transformation. Bleach & discard the rest.
Incubate the large liquid culture of transformed cells 32C, 180-220 rpm O/N (16-24h)
The lower temp. helps maintain even library coverage as the cells grow
Plate a 10 uL aliquot and 100 uL aliquot of the 1:1000 diluted cell cultures on separate LB+carb agarose plates. Spread plated cells w/ beads. Incubate plates upside down, O/N at 37C.
Next day, count # of colonies on each plate to estimate transformation efficiency and midiprep (or maxiprep) grown culture of cells transformed with CRISPR library (see next step)
Plate #1: 10 uL of 1:1000 diluted cells transformed with CRISPR library) 35 colonies
Plate #2: 100 uL of 1:1000 diluted cells transformed with CRISPR library) 300 colonies
Plate #3: 10 uL of 1:1000 diluted cells transformed with pUC19 plasmid) 2 colonies
Plate #4: 100 uL of 1:1000 diluted cells transformed with pUC19 plasmid) 11 colonies
CRISPR library transformation efficiency) 300 colonies / 100 uL * 1000 uL / 1 uL * 2000 uL = 6e6 total transformants / (100 ng DNA * 0.01 ligation efficiency) = 6e9 CFUs / ug
pUC19 transformation efficiency) 11 colonies / 100 uL * 1000 uL / 1 uL * 2000 uL = 2.2e5 total transformants / 20 pg plasmid ~= 1.1E10 CFUs / ug
Takeaways: Transformation was successful with pUC19 control returning > 1E10 CFUs / ug, as promised by supplier, while generating 6 million transformants from our cloned product
6e6 transformants / 310 unique constructs ~= 20,000 transformants / construct which well maintains our coverage (i.e. ensures we didn’t bottleneck our library during this step)
Interestingly, we obtained 6e6 transformants from an estimated 70e6 assembled molecules input suggesting a transformation efficiency of 5-10% (nobody ever reports it this way as we only really care about total # obtained)
Similarly, we obtained 2.2e5 transformants from 20 pg (7e6 molecules) of purified pUC19 plasmid suggesting a transformation efficiency of 3-4%
Purifying plasmid library by midi- or maxiprep
I’m not going to cover this step in detail because I just follow the kit manufacturer’s protocol exactly (ZymoPURE II Plasmid Midiprep Kit, catalog no. D4200 or D4201)
Typically, I’ll purify plasmid from 100 mL of the grown culture as 2x50mL midipreps to keep the centrifugation steps balanced. I then elute the plasmid DNA with 200 uL elution buffer / replicate, include the extra endotoxin removal step, and then pool the final volumes from each technical replicate together for a total of ~350 uL. This is our final CRISPR plasmid library. Quantify by Nanodrop.
Final CRISPR plasmid library) 850 ng/uL (1.9/2.3) ————*350 uL———> ~300 ug total
This is plenty of plasmid, enough for packaging >500 mL of lentivirus … although notably it’s nowhere near the 1.2 mg per 50 mL culture that Zymo claims is achievable in just 16 min (lol @ supplier claims these days… they’ll say anything to distinguish themselves from the competition)
Okay we have our cloned CRISPR plasmid library, protocol done! Or is it? Before we label this a success, we want to verify that our pool of plasmid is indeed what we think it is — that is, we want to confirm the desired spacers were inserted correctly into the lntCRv2 backbone and that all the different spacers in our library are, hopefully, present at somewhat even amounts within the pool of constructs. In other words, we want to ensure that our plasmid library is still representative of the oligo library we originally received. How do we do this? By sequencing.
We are going to verify our plasmid library by two sequencing methods:
Long read Nanopore sequencing - to confirm the overall purity & general (consensus) sequence of the plasmid pool
Short read Illumina sequencing - to confirm the individual spacer sequences & their abundance in the pool (i.e. the distribution of individual constructs in the library)
Why can’t we verify everything all at once? Because each sequencing method has it own set of advantages & disadvantages and we want to be as comprehensive as possible.
I’ll spare you all the details on sequencing for now, I could go on for a while… look out for other protocols on the topic in the future
Validating our cloned CRISPR library by long read sequencing (Plasmidsaurus!)
This step is as simple as it gets, we’re just going to submit a small aliquot of our final CRISPR library (plasmid pool) to a company for rapid, long-read sequencing. I’m going to use Plasmidsaurus because they’re great and we have a dropbox on campus where samples are picked up daily. It costs $15 / sample and results arrive within 24h. While I absolutely love their service I’m by no means sponsored so please use whichever company you like, or sequence yourself if you have a Nanopore instrument and kits available!

Submission:
Submit an order online and print out confirmation form
Standard high-concentration plasmid sequencing (for plasmids < 25kb in length and > 200 ng/uL in concentration)
Aliquot 5 uL of CRISPR plasmid library (850 ng/uL) to a strip tube.
Label tube as instructed on confirmation form. Package sample+form in a bag.
For extra protection, I actually place the strip tube in a 50 mL conical and then place that in a bag w/ the form
Place bag in designated dropbox (or mail out yourself).
Results arrive by email, usually the following morning, and include a bunch of analysis files summarizing the sequence and quality of the submitted plasmid sample(s). I’ll highlight a few of these. You can also download the raw data (all sequencing reads, compiled in a single .fastq file) which I highly recommend. Here’s some of the data from our cloned CRISPRko library:

On the left is an image of the plasmid map provided by Plasmidsaurus as an interactive html file. This is a consensus sequence produced by them after aligning all the reads and annotating it with common elements. With a quick glance, we see that all the expected pieces of our backbone here including the lenti components and Cas9 while the large filler region between the U6 and EF1a promoters is not (b/c we replaced it out with our 20bp spacers). To note, I also swapped out the puroR casette with eGFP for my screen - not really important here.
To know if this assembly exactly matches our desired product, we’ll have to align the consensus sequence to our reference but, first, let’s examine the purity of our cloned library by looking at the distribution of obtained read lengths (top right). You can see almost all reads are ~13kb, the full size of our expected plasmid, which suggests we have a pure sample (and that Plasmidsaurus prepares plasmids for long read sequencing by linearizing/adapting with barcoded Tn5 transposase in enzyme-limited conditions). Earlier, our main concern was that, if we didn’t fully digest the lntCRv2 plasmid before ligating in the inserts, any incompletely digested (“single-cut”) backbone could re-ligate together without an insert. This event would reproduce a circular plasmid ~15kb in size which would contaminate our final library (as “background”), mess up downstream experiments, and be obvious in this plot by a peak of reads existing at ~15kb in the histogram. Nicely, we don’t see that, confirming we have a pure pool of constructs.
One quick note on the histogram, Plasmidsaurus strangely plots this distribution in terms of “thousands of bases” instead of “# of reads” which would convey the same information while being more directly interpretable.
On the bottom right of the above figure panel, we have a coverage plot that Plasmidsaurus generates by, first, aligning all reads to form a consensus sequence and then aligning each individual read back to this consensus sequence counting, at each position of the consensus, how many reads have an aligned base. Therefore, the y-axis represents # of total reads which we can see was ~300 for this sample. We also see nice “even” coverage indicating that our plasmid pool is uniform in sequence and structure.
Hopefully you can now appreciate the usefulness of that large (2kb) filler region that we excised originally, at it makes it easy to confirm here that our backbone was truly completely double-digested before the ligation step. It’s now very likely our library is the correct structure but let’s aligned the assembled sequence to a reference to confirm:
Above is a visual representation of aligning the long read consensus sequence (in the .genbank file provided by Plasmidsaurus) to the reference lntCRv2 + cloned insert plasmid map I created in Snapgene. The dark red bar above the annotated reference map indicates that our sequenced CRISPRko library is primarily what we expect it to be - perfectly matching the majority of the reference. The only place our sample’s sequence doesn’t match the reference (indicated by a small region that is not a filled dark red, which indicates mismatch, with a short vertical line protruding at its start, indicating an insertion) is between the U6 promoter and the optimized sgRNA scaffold - right where the inserted spacer sequence should be. This makes sense as the reference map just has an 5’-GNNNNNNNNNNNNNNNNNNN-3’ sequence here to represent the variable nucleotides of the spacers we hope to have cloned in. Let’s zoom in on our alignment in this region:
Note that the reference sequence is now on top (and middle) while the long read consensus sequence (our query) at the very bottom. We see that the query matches the reference exactly (including a 5’-G at the TSS of the U6 promoter) except at the variable spacer region (highlighted). However, why are there 21 non-matching bases in this region instead of 20 like we designed - which is the ideal length of the targeting spacer sequence in the optimal sgRNA for SpCas9? Also, why are there definitive bases at all in the query sequence instead of just ambiguous “N”s considering we should have a bunch of different sequences in this region in our submitted sample? The answer to both lies in the technical details of Plasmidsaurus’ analysis which produces a consensus sequence for each sample by aligning all collected reads and assuming we provided a single purified plasmid not a library of plasmid constructs differing slightly at one particular region. After they align all the reads for a given sample, they then call the most frequent base at that position the “true” base and produce a consensus from there. The reason for doing it this way is that long read sequencing is highly error prone so individual reads contain a lot of incorrectly called bases whereas the likelihood of many reads containing the same error is very small thus allowing noise to be reduced by deferring to the majority call at each position. So, the 21bp sequence they report likely won’t match any spacer we included in our library but is an aggregate of the most frequent nucleotides at each position along the spacer region. Still, why 21bp instead of 20bp? An artifact of their alignment method which we can confirm by aligning a few of the raw Nanopore sequencing reads from our sample, instead of the consensus sequence, to our reference map:

Above, you get a sense of how noisy individual long read sequencing reads are. The errors are fairly stochastic although you can see some regions of the plasmid are slightly more enriched than others. Below, you see that individual reads from our library contain a variable 20nt spacer sequence, as expected. The sequences should (and do) match specific oligos we ordered.
Sidenote: you may notice here my sgRNA design includes a 5’-G followed by a 20nt spacer complementary to a given target region of interest in the human genome. It’s currently up for debate in our lab if this design is better or worse than a 5’-G followed by a 19nt complementary region. The optimal size for SpCas9’s spacer sequence is 20nt in full but the 5’-G helps with transcription of the sgRNA off the U6 promoter and, typically, the more complementarity to a region the better for binding/editing thus leading to competing design principles. We’ve done enough CRISPR to know either way works fairly well in the end but we haven’t yet done a systematic study to prove which is generally better.
Validating our cloned CRISPR library by short read (Illumina) sequencing
Okay so long read sequencing confirmed the general structure of our cloned plasmid pool is correct now let’s evaluate the distribution of unique constructs (spacers) within the pool using high throughput sequencing by synthesis. I’ll spare you the details on Illumina’s process/chemistry for now (separate post) but the important thing to know for this is that we need to PCR amplify out the variable region of interest in our plasmid while adding constant regions (adaptors) to the ends of the DNA fragments to make it compatible for sequencing. Along the way we’ll also add unique indexing sequences to the ends of the DNA to barcode our sample but that doesn’t really matter here since we’re only sequencing 1 sample (the plasmid pool).
Altogether, we’ll adapt our DNA of interest for sequencing using two, back-to-back PCRs… now hopefully it makes sense why I called the initial library amplification “PCR0”
“PCR1” - amplifying the target region while adding constant end sequences
oAEL052_w_TruSeq (forward primer): 5’ - ACACTCTTTCCCTACACGACGCTCTTCCGATCTTCTTGTGGAAAGGACGAAA - 3’
oAEL053_w_TrusSeq (reverse primer): 5’ - TGGAGTTCAGACGTGTGCTCTTCCGATCTTGTTTCCAGCATAGCTCTT - 3’

Shout out to AEL who designed these primers cleverly to amplify both correctly integrated spacers and any erroneous integrations by sitting them directly outside of the BsmBI/Esp3I cut sites. This way we’ll have the full picture of how successful our library was cloned. The 5’ ends of each primer contain constant regions for adapting the amplified DNA to be able to sequence on Illumina’s instruments, specifically by adding part of Illumina’s TruSeq adaptors.
Dilute plasmid library to ~10 ng/uL
1 uL of v2 CRISPRko plasmid library (850 ng/uL) + 100 uL dH2O
Prepare PCR master mix (enough for 10x50uL reactions):
25 uL Phusion Plus MM * 10 = 250 uL
24 uL dH2O * 10 = 240 uL
0.25 uL of oAEL052_w_TruSeq (100 uM) *10 = 2.5 uL
0.25 uL of oAEL053_w_TrusSeq (100 uM) *10 = 2.5 uL
Distribute 50 uL of PCR MM / strip tube (n=8 tubes total)
Spike in 1 uL of diluted plasmid library per rxn (except for 8th tube which is negative control)
Seal caps tightly then briefly vortex and spin down tube strip.
PCR for 12 cycles:
98C, 30s
[98C, 10s, 60C, 10s, 72C, 20s]*12 cycles
72C, 2 min
4C, hold
Run small aliquot of each completed PCR1 rxn on 2% agarose gel
I’ll typically dilute 2 uL of PCR1 product in 18 uL dH2O and run on Invitrogen’s E-Gel EX system for 10 min (yes, we’re spoiled)
Expect band (128bp) to be quite faint as we’re trying not to overamplify the library and introduce any additional skew.
Alternatively, you can purify/concentrate the positive PCR1 rxns prior to confirming band on gel but I don’t recommend this unless you’re confident in the PCR (i.e. have validated it previously)
Purify positive PCR1 rxns by double-sided Spri
Pool all 7 positive rxns together for a total of ~350 uL and dilute up to 500 uL with dH2O
Add 300 uL SpriSelect / sample (0.6X SpriSelect). Vortex to mix. Allow 3-5 min to bind DNA, quick spin, then place on magnet and allow another 3-5 minutes to sequester beads.
Transfer sup. to new microfuge tubes. Discard beads which effectively removed all input plasmid DNA leaving behind only fragments < 200 bp
Add another 600 uL SpriSelect / sample for a final 1.8X SpriSelect concentration (should bind 130bp dsDNA now since a 1.2X SpriSelect gets anything >150bp)
Vortex to mix and incubate 3-5 minutes, quick spin, then apply to magnet and wait another 3-5 min
Wash beads 2x with 1 mL of 85% EtOH (wait about 20-30 secs after applying EtOH straight to the side of the tube with the beads)
Spin to pull down beads and residual EtOH after last wash. Place back on magnet and remove excess EtOH. Dry for about 1-2 minutes with cap open.
Apply 50uL of dH2O while tube is still on magnet to elute DNA from beads. Vortex well to re-suspend beads in soln (maximizing elution). Briefly spin down then place tube back on magnet and wait for beads to migrate out of solution. Transfer supernatant (containing eluted DNA) to clean tube careful to avoid transferring any beads along with it.
Measure purified PCR1 product by Nanodrop
PCR1 product) 11 ng/uL (1.7/1.9) ——*50uL——> 550 ng total
If you want, can run (again) on 2% agarose gel to confirm purification of the correct ~130bp amplicon
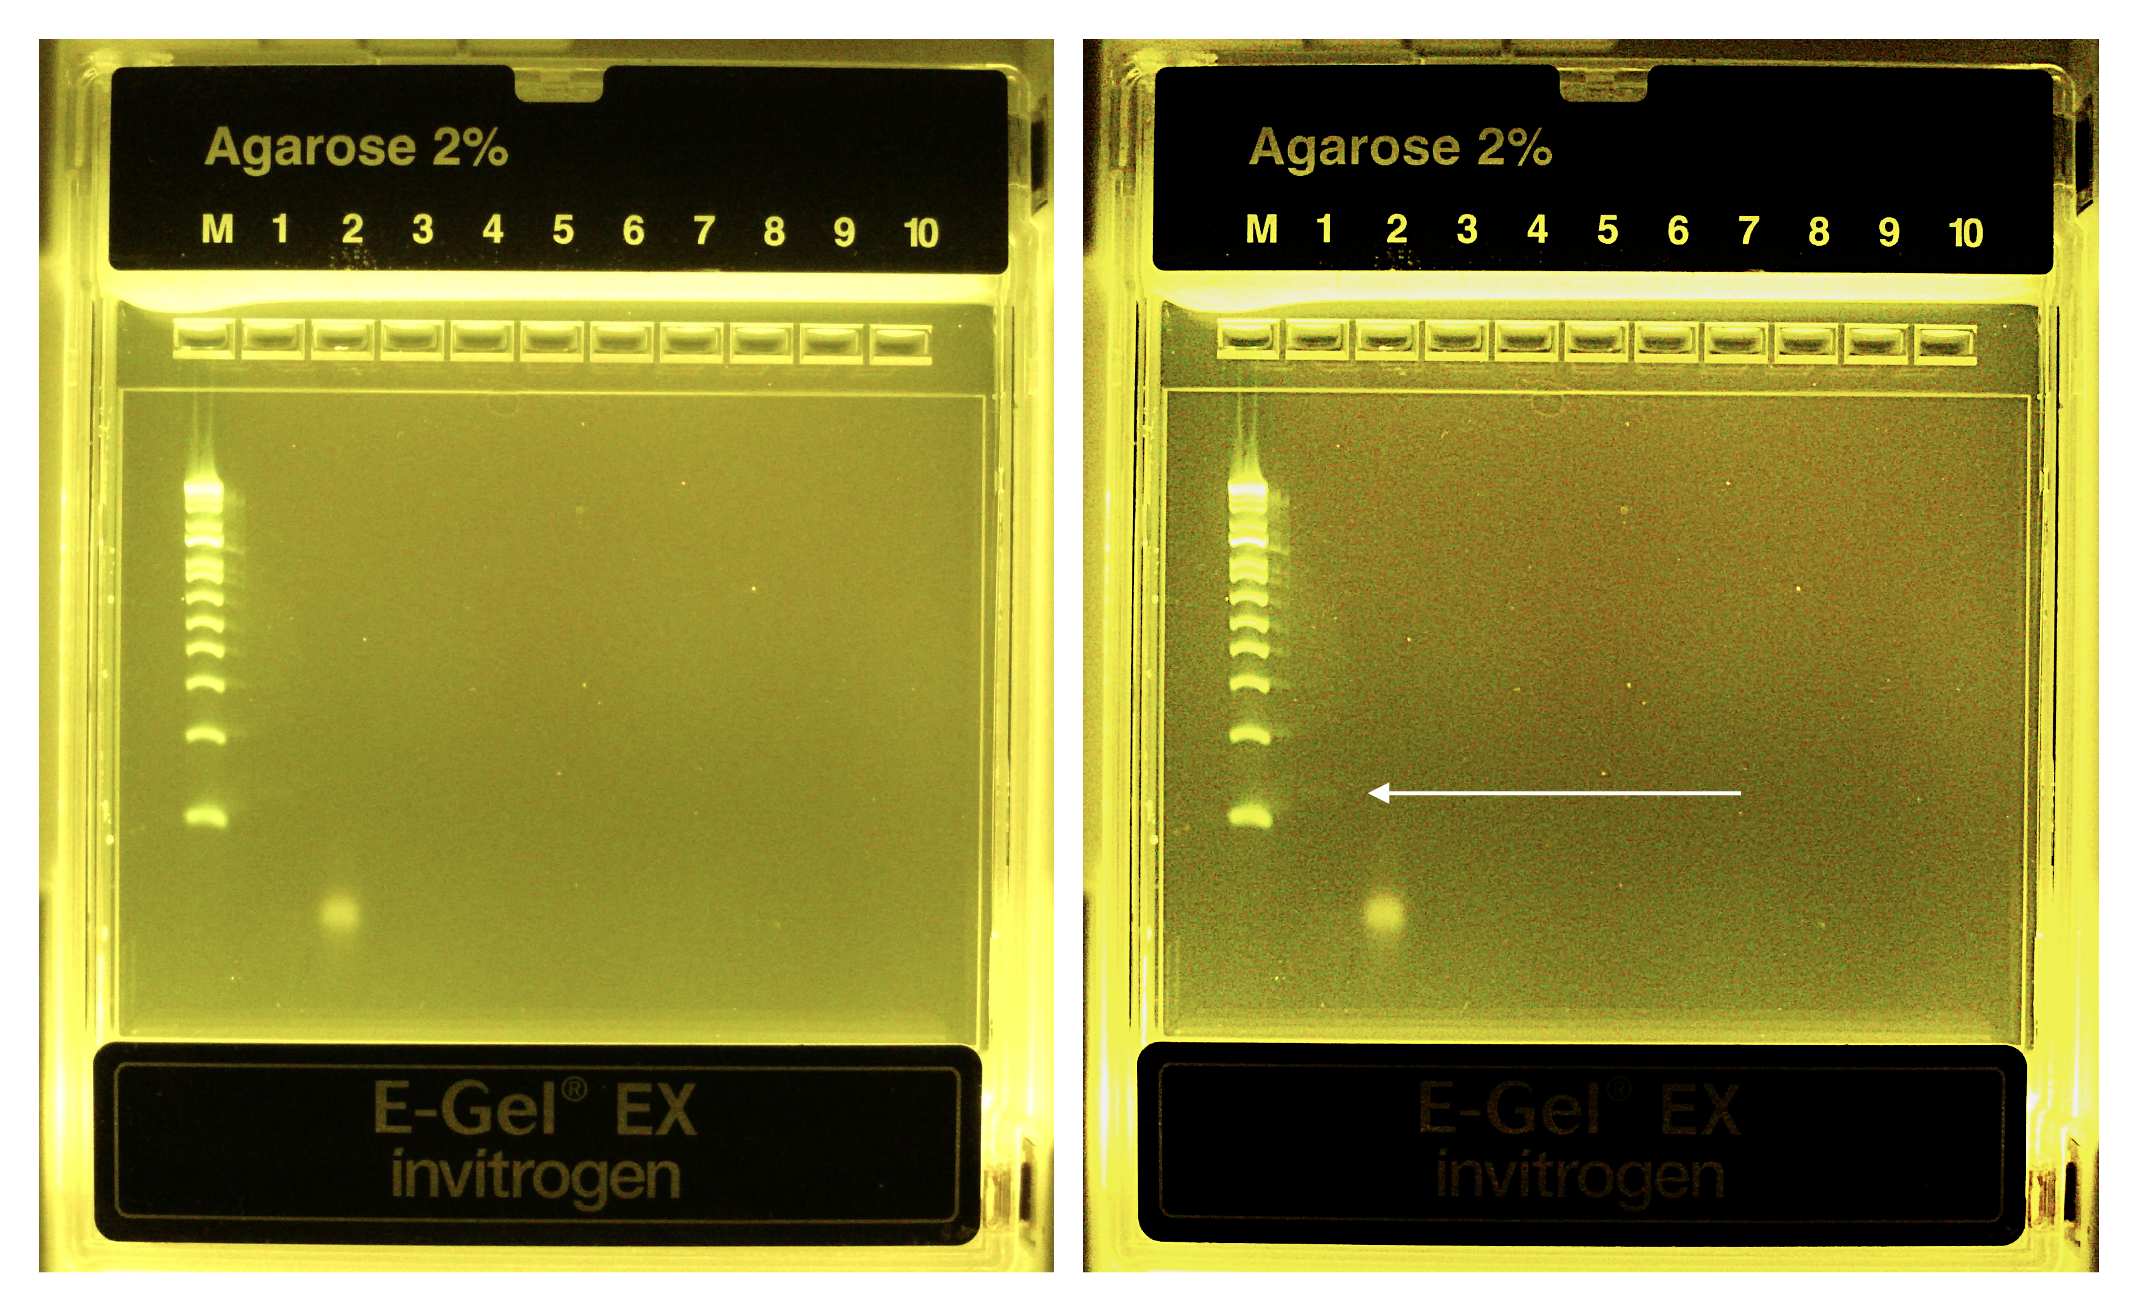
Lane (M) 1 kb Plus ladder, (1) PCR1 rxn product, (2) negative control rxn product. Told you it would be faint. Same gel image side-by-side with contrast enhanced on the right. You can see a primer dimer formed in the negative control rxn in the absence of template.
“PCR2” - adding the final indexes & Illumina adaptor sequences
PCR2 TruSeq forward indexing primer: 5’ - AATGATACGGCGACCACCGAGATCTACACNNNNNNNNACACTCTTTCCCTACACGAC - 3’
PCR2 TruSeq reverse indexing primer: 5’ - CAAGCAGAAGACGGCATACGAGATNNNNNNNNGTGACTGGAGTTCAGACGTGTGCTCTTC - 3’

Thaw pre-mixed Illumina TruSeq indexing primers (10 uM / primer)
Prepare PCR2 master mix:
25uL of Phusion Plus 2x MM * 3 rxns = 75 uL
20uL of dH2O * 3 rxns = 60 uL
Distribute 45 uL per strip tube (n=2):
Add 2.5 uL of indexing primer mix per tube (different mix for each tube)
Add 3 uL of purified PCR1 product to rxn #1 (10-50 ng total)
Add 3 uL of dH2O to rxn #2 (negative control)
Thermocycle:
98C, 30s
[98C, 10s, 60C, 10s, 72C, 20s]*6 cycles
72C, 2 min
4C, hold
Dilute small aliquot of completed PCR2 rxns 1:20 in dH2O and run on 2% agarose gel
Expect 203bp amplicon if successful
Also dilute and run purified PCR1 product (128bp) for side-by-side comparison
Once amplicon is confirmed, purify PCR2 product by 1.5x SpriSelect
Dilute PCR2 rxn to 100 uL total w/ dH2O
Add 150 uL of well-mixed SpriSelect beads
Follow standard protocol, except wash with 80% EtOH (instead of 75% or 85% EtOH)
Elute DNA in 50 uL dH2O and transfer to clean tube
Measure by Nanodrop
PCR2 product) 10 ng/uL (2.0/2.0) ——*50uL——> 500 ng total
If necessary, clean up PCR2 product once more by 1.5X SpriSelect purification then proceed with sequencing (see separate protocol on MiSeq i100 loading)

Lane (M) 1 kb Plus ladder, (1) PCR2 product rep. 1 (2) PCR2 product rep. 2 (3) 1 kb Plus ladder (4) PCR1 product rep. 1 (5) PCR1 product rep. 2. You can clearly see the addition of the final adaptor sequences in the PCR2 product.
HTS results: Evaluating spacer representation (i.e. library diversity)
The final library generated with PCR2 should be sequenced deeply enough that all spacers present in the sample are detected 100s to 1000s of times (as separate reads) to ensure sufficient capture. Otherwise, we may misinterpret dropout as skew. For a ~300 construct pool, this means we should aim to obtain at least 300,000 reads total. Since sequencing is cheap and there is always the potential that the library is heavily skewed, I typically aim for at least 10,000 reads per construct on average.
Sparing you the details (maybe I’ll post the python script on Github and share a link), the key to analysis is to go through each read and match it to one of the spacers from our library, counting up the total matching reads for each unique construct that we ordered/cloned. If our library and sequencing run are good, most of the reads (>90%) should be matched to an intended spacer and the spacers should have similar numbers of total assigned reads (uniform coverage). With a simple approach (rigid region extraction & perfect match requirement), 93% of the total reads (12e6) were matched with the following distribution, which we can compare to TWIST’s example of a well-distributed library (and a heavily skewed one).

You can see TWIST’s example distribution for a synthesized library (far right) varies in the # of reads per construct by ~0.75 units on a log10 scale i.e. ~6-fold in magnitude between the most abundant and least abundant constructs whereas our library varies by ~1 unit on a log10 scale (i.e. 10-fold). Overall, this means we did pretty well! Not much skew was introduced during amplification/cloning of the library based on what you’d expect from the original pool. You can also compare the shape of the log-scaled distributions (v2 CRISPRko library vs. “TWIST synthesized”) to see they’re both fairly normally distributed with a bit of a left-leaning tail (some DNA sequences are harder to synthesize than others e.g. ones with G quadruplexes).
Overall we should be quite happy with this result but how does it compare to perfect uniformity (the theoretical limit)? For this, we can calculate the Gini coefficient of the library, a statistic that measures the total bias in a distribution with Gini=0 being perfectly unbiased (uniform) and Gini=1 being completed biased (only 1 construct present in library). This is a stat from economics that’s based on the Lorenz curve which plots the distribution of wealth in a society.

Image from Wikipedia to which I am a proud donor
The Gini coefficient is the ratio of the grey (A) region of this triangle plot to the total area (A+B=0.5) when plotting cumulative fraction of a population by cumulative share. If a society is perfectly equal and everyone has the same wealth/income then the Lorenz curve would be equivalent to x=y and therefore A=0 and Gini coef. = 0. If a single person in the society has all the wealth then the Lorenz curve would be flat until the very end and the area of A would be the same as A+B thus Gini coeff. = 1.
In genomics, a decent Gini coefficient for a cloned library is < 0.3, calculated WITHOUT log-scaling the reads
The MaGeck analysis pipeline reports a contrived Gini coeff. from log-scaled reads which shrinks the value considerably. This has led to a mess in the literature as everyone reports library diversity using Gini coeff. but doesn’t specify if it was calculated from linear or log-scaled read counts.
A very good library has a Gini coeff. < 0.2 (again, without log scaling the reads)
You can put the Gini coefficient in terms of a percentage at which point it’s referred to as the Gini index
The Gini index of wealth in the U.S. is 42… this isn’t great considering it’s RISEN by 10% over the last 30 years…
I wonder if anyone’s estimated the stable range in which the Gini index can fluctuate in a society before the system of government is replaced…
In summary: when comparing a Lorenz curve to its theoretical limit (perfect equality), the Gini coefficient = A / (A+B)
Below are a few plots summarizing the state of our cloned library based on the sequencing results, a Lorenz curve can be built by first counting all the reads assigned to each construct in the population (library) then organizing from least to most abundant, normalizing by the total # of assigned reads, and summing the values along the way (i.e. cumulative frequency).
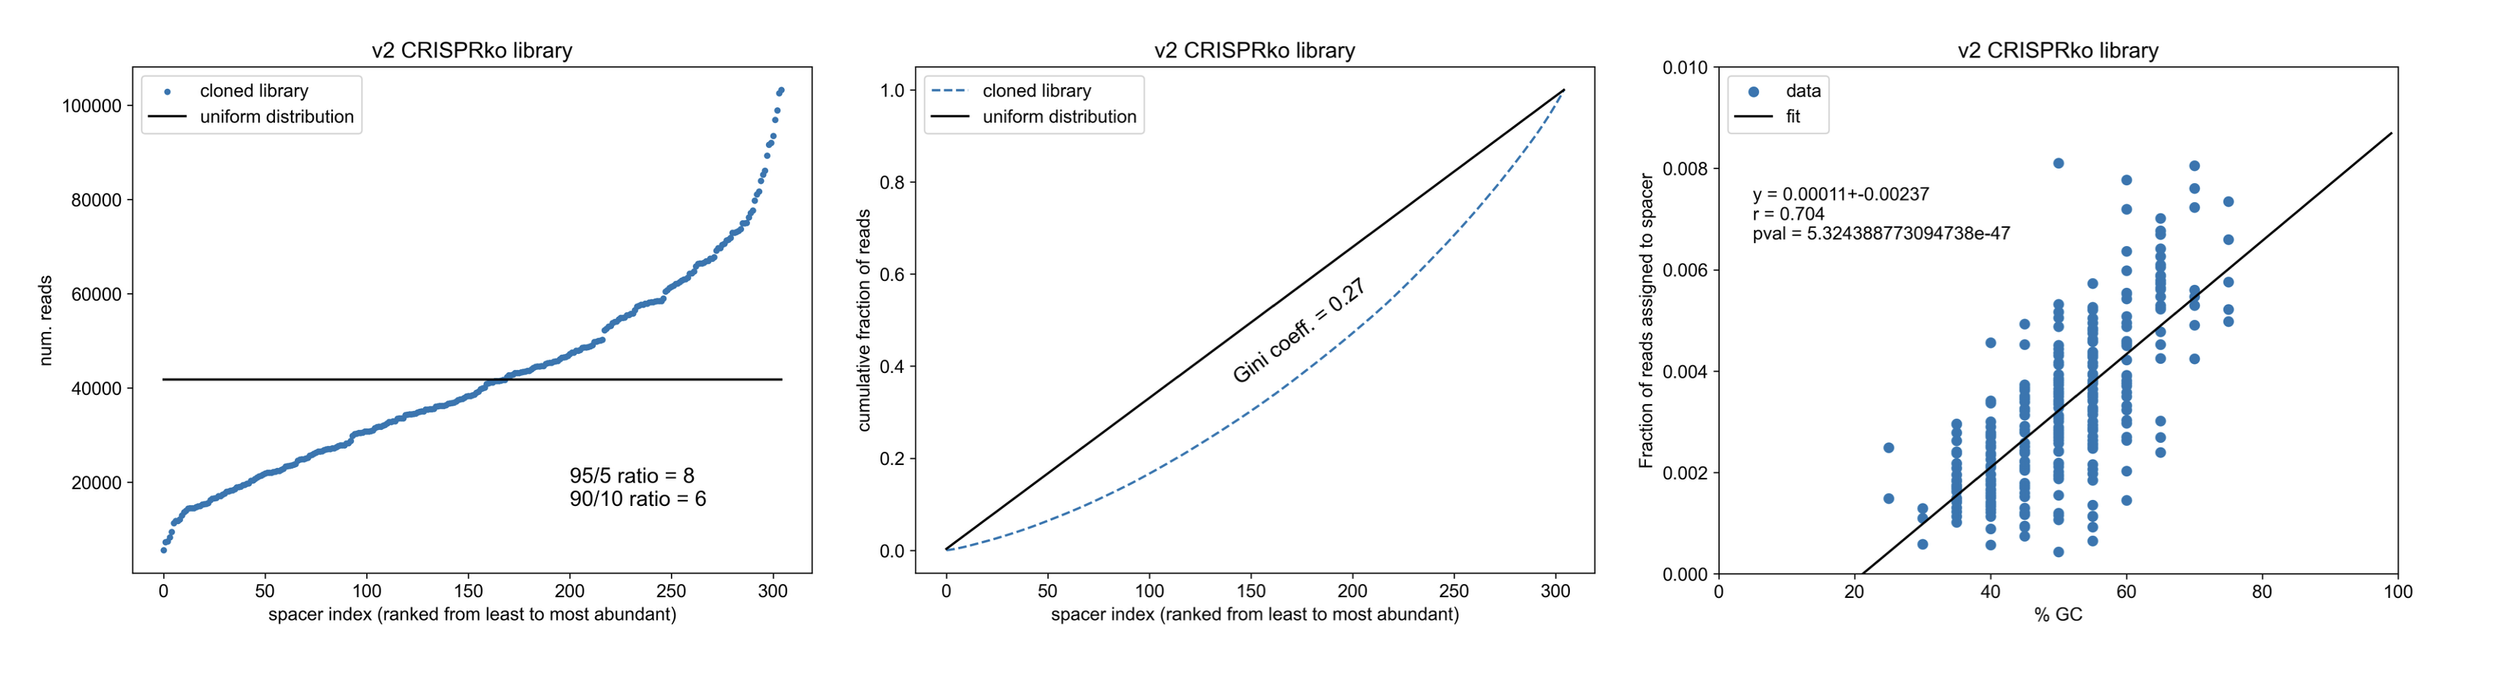
The far right plot of the figure panel, above, highlights an interesting trend within our library in which spacers with a higher GC content are more abundant. This correlation is highly significant and suggests a possible mode through which our library is being skewed during cloning. DNA fragments with more guanines (G) and cytosines (C) are more stable and, thus, less likely to melt apart at any given time. The stage at which our inserts are most vulnerable to melting apart is during/after digestion when we produce ~25bp fragments, extremely short DNA with an average Tm of ~60C. Even so, at temperatures such as 37C (the incubation temp. during digestion) or even room temp., some AT-rich (GC-poor) fragments may be susceptible to melting apart (remember the definition of Tm) and, therefore, unable to ligate correctly into the backbone later on thus producing the trend we see in the final cloned library. I thought maybe this melting was happening during the long ligation step so I tested different conditions (4C ligation O/N vs 10C ligation O/N vs. room temp. ligation O/N) but observed minimal differences although 4C did produce the library w/ the best Gini coefficient (=0.27 i.e. the library shown above vs. 0.28-0.32 for the others, not shown).
This concludes the protocol. The next step would be packaging our cloned library into lentivirus (which I’ll include as a separate protocol) and then transducing into any cells of interest.
Altogether, our cloning was successful and produced a somewhat balanced library, however, deeper analysis reveals there is room for improvement with the problematic step likely being the generation of small, 25bp DNA inserts. I’m very curious how other large scale CRISPR library cloning protocols using ligation get around this as most protocols recommend gel extracting the digested inserts using crush-and-soak (like we did) followed by a 70C incubation to elute the DNA from the gel which is certain to melt the majority of the fragments… sure the DNA will re-anneal upon cooling but with a large, diverse library I’d guess it’s very unlikely the ssDNA re-anneals correctly back to its perfect complementary sequence. Maybe this doesn’t matter in the end if most the the ssDNA anneals partially correctly (and the ends of the molecules) to allow for ligation to occur as E. coli will resolve the “bubble” b/w non-complementary spacers as it replicates the plasmid during expansion. It might be worth doing a similar analysis of GC content vs. representation for published CRISPR libraries, the only problem being most labs don’t share the raw sequencing results of their cloned libraries (a bad practice that should be corrected). Either way, you can see why people have switched to other methods of cloning (e.g. Gibson or CPEC) as they eliminate the need to generate such short DNA inserts which avoids a lot of hassle and biasing.
Thanks for reading to the end, hopefully this detailed walkthrough of cloning a CRISPR library helped you in some way!
For a better & easier approach to cloning CRISPR libraries see https://www.rmcnulty.com/protocols/circular-polymerase-extension-cloning
Extra
Interestingly, while looking for raw sequencing data for a published CRISPR library, I ran into this interesting note in the methods section of Compact and highly active next-generation libraries for CRISPR-mediated gene repression and activation eLife 5:e19760. https://doi.org/10.7554/eLife.19760
They request each designed sequence twice when ordering oligos to help even out the representation. Not sure how effective this is since a problematic sequence to synthesize remains a problem whether printed once (tens of millions of molecules) or twice (twenties of millions of molecules) but it can’t hurt with smoothing out stochastic synthesis issues (alliteration unintended) if you have the $$$.
That reminds me, I promised a breakdown of CRISPR library cloning costs. Really the project-dominating costs are:
The oligo pool (see pricing table including in section above)
Ilumina sequencing to validate ($300-$800 for 5-25M reads)
Everything else is trivial and usually already stocked as common reagents in a molecular biology lab. For a small CRISPR screen (e.g. perturb-seq) requiring <500 unique constructs it’s realistic to clone the library for <$1000 in total. For a genome-wide CRISPR screen (20,000 genes * 5 sgRNAs/gene = 100,000 oligos), you’re looking more at $20,000. Of course, in both cases there is also the downstream experimental costs of conducting/analyzing the screen once the library is good to go.