High-throughput (short-read) sequencing using an Illumina MiSeq i100 (Plus)
I’ve been using the Illumina Miseq system for my small sequencing runs (amplicon libraries to assess on-target editing, small CRISPR screens, validating whole genome & (sc)RNA libraries before deep sequencing) over the last 5 years and recently our genomics core acquired the newest version, the Illumina Miseq i100 Plus, and it’s amazing. I wanted to share details on how to load/run it since it’s much easier, faster, and cheaper and I figure it’ll be quite popular for the foreseeable future. This also allows me a space to walk through Illumina’s chemistry.
Why do I like this instrument so much? It’s a huge improvement over the original MiSeq in all the categories that matter (sequencing yield, kit cost, loading time, runtime). For example, it used to cost ~$1000 for a 5M read, 300-cycle kit which would take 1-2hrs to load (including the time it took for the reagents to thaw) and 24hr to sequence. With the new Miseq i100, for ~$500, I can purchase a 5M read, 300-cycle kit which takes <30 min to load (no thawing required) and 8hr to sequence. Essentially, everything improved 2-4x. That’s significant progress.


Here old vs. new instruments and flow cells shown somewhat to scale relative to one another

Library generation
There is already a great online resource summarizing Illumina adaptors and sequencing chemistry (https://teichlab.github.io/scg_lib_structs/methods_html/Illumina.html) but I’ll summarize briefly here focusing on the Miseq i100 approach (which matches the NovaSeq 6000). I’ll also include some details on upstream steps (library generation & cluster generation).
The core idea is we need to add universal ends to our DNA of interest so that’s it’s “sequenceable” on Illumina’s instruments. In other words, we need to adapt our DNA. Along the way, we also make sure the DNA is within an acceptable size range (typically 200-800bp) for sequencing (a limitation set by Illumina’s technique) and add unique sequences (“indexes”) to the DNA to mark (“barcode”) separate samples so that we can pool and sequence a bunch of DNA from different sources together and then assign the results (“reads”) back to their original samples later. There’s a lot of jargon when it comes to sequencing but it’s all fairly sensible once you understand the fundamental steps.
There are countless ways to adapt your DNA of interest to include the indexes and constant end regions required for sequencing. How you choose is largely based on the material you’re starting with and the nucleic acids you’re trying to capture. In our lab, we do a lot of target site analysis where we sequence a specific region of interest in the human genome, usually after introducing reagents to modify that particular site in a population of cells. The results allow us to determine how efficiently our intended edits were introduced. I’ll make a separate protocol for target-site sequencing with all the details but for now what’s important is that we simultaneously amplify, index, and adapt our target DNA using back-to-back PCRs:

The final library structure
Details
In PCR1, we are amplifying a site of interest (<1000bp in length) out of the genome using primers A1 and B1 which complement opposite strands of the target dsDNA and each contain extra, constant sequences on their 5’ ends which don’t complement the target site but are required for Illumina sequencing.
In PCR2, we are further extending the constant regions on each end of the target DNA (shaded = shared sequence) while also barcoding the DNA in the sample by using primers A2 and B2 which contain short sequences that are unique to the individual sample. In other words, if we had 10 different samples we should need 10 different A2+B2 primer mixes each containing their own unique index sequences.
Of course, in the end the DNA isn’t kinked like shown in the cartoon but a long, linear dsDNA product where we’ve added ~140bp of extra sequence in total (~70bp on each side). These added regions include unique sequences barcoding the sample as well as constant sequences to enable flow cell binding & sequencing.
Why did we split this up into 2 separate PCR steps? Ideally, we’d doing everything in one step however Illumina’s sequences contain some palindromic regions across forward and reverse primers which often produce a lot of concatemers if you try to add everything in 1 step. Also, with two PCRs, we can kind of physically separate the process into (1) isolation of the target DNA and (2) final barcoding and adaptation.

Here, the region of interest (green) can be anywhere between 50-1000bp in length. Typically, we keep it <500bp so the full region can be covered during sequencing. Adapting the DNA adds another ~140 bp of sequence in total.
Technically, the only absolutely essential sequences that need to be added to our DNA of interest for compatibility with Illumina sequencing are the very 5’ ends of the dsDNA shown above (the “P5” and “P7” adaptors, highlighted in pink) as these enable binding to the instrument’s flow cell. However, we typically also add extra constant sequences designed by Illumina (“TruSeq” or “Nextera” adaptors, included as part of the PCR1 and PCR2 primers shown in yellow/orange) for ease in later steps.
Sequencing details (i.e. what’s happening on Illumina’s instruments)
(section pending, I got busy)
Loading protocol:
Decide on which kit you want to run (see table on right or Illumina's website for more details)
Available kits generate 5M or 25M quality reads with 100-, 300-, and 600-cycle options. 50-100M read kits coming soon for the i100 Plus which is a good size to validate large cloned libraries or assess small, CRISPR-based screens.
Kits composed of two separate components (dry reagent package & wet reagent box)

Retrieve package of dry reagents and set aside
Contains single, large cartridge containing flow cell and sample loading wells.
Stored at room temp. so no need to thaw or keep on ice
Note the letter ("A" or "B") on the package indicating which wet reagent box you need.
Retrieve box of wet reagents
Contains 2 small vials of buffers on top for sample prep and a larger, sealed container of sequencing reagents/buffers
Stored at room temp. so no need to thaw or keep on ice
Make sure letter ("A" or "B") on top/front matches dry reagent package
Open wet reagent box to retrieve vials of RSB (resuspension) and KLD (denaturation) buffers
Prepare (at least) 25 uL soln of pooled libraries at 1 nM (1000 pM) total in resuspension buffer (RSB). Once made, briefly vortex and spin.
An example from my test run (“HTS_RAM_080"):
3.33 uL of diluted HTS_RAM_80 sample (3 nM)
5 uL of Phi-X (1 nM... loosely)
16.7 uL of resuspension buffer (RSB)
This means I now have a solution where my library is at a 0.4 nM concentration and phi-X is at 0.2 nM concentration for a total of 0.6 nM (600 pM)
Illumna recommends a 1 nM (1000 pM) library here which then gets diluted 0.1x in KLD buffer for a final loading concentration = 100 pM but this needs adjusting based on the library type, especially for small amplicon libraries which for some reason sequence more efficiently, my guess is b/c they bind to the flow cell better / more easily.
Dilute pool of DNA 0.1x by adding 225 of KLD buffer to 25 uL of "1 nM" sample. Briefly vortex and spin.
Now "100 pM" and all ready to load (actually 60 pM for my test run)
Next, open dry reagent package containing flow cell (no need to wash).
Pierce foil for "library" well (leftmost well) and load all 250 uL of prepared sample (denatured library at “100 pM”)
Other wells are for custom primers so disregard if not using (i.e. if you’re sequencing with the standard TruSeq or Nextera adaptors).
If you are using custom primers, you’ll need to dilute in hybridization buffer which you now need to buy from Illumina separately (doesnt come w/ the i100 kits)
Bring everything (loaded flow cell and wet reagent cassette) to MiSeq i100 instrument, sign in, enter run parameters, and load
Note: Should DESELECT the option to read indexes first so that MiSeq i100 operates "normally" (as old MiSeq used to) and reads R1 first before i7 then i5 then R2
Load dry reagent cartridge first, follow graphic to ensure correct orientation
Load wet reagent cartridge second, follow graphic to ensure correct orientation
Start the run following the on-screen commands. The instrument takes ~10-20 min to perform system checks then proceeds automatically into run
You don't need to return to instrument to officially start the run after system checks, although you should check to make sure it passed all system checks
Once running, Miseq i100 provides estimated time of completion (4-14h depending on kit and # of cycles)
It will take 2-3hr from start of run for instrument to provide estimate on cluster density
My run took 6.5h total from start (run started) to finish (data uploaded) for 25M, 100-cycle kit. Factor in another 0.5 hr for sample pooling, diluting, and loading.
My test run generated 35M reads total with 5M from phi-X (14%) from a loading concentration of 60 pM
Checking with our core director, it appears 30-50 pM is the sweet spot for amplicon libraries +/- phi-X
For more diverse libraries (e.g. RNA-seq or whole-genome libraries), you can/should target the recommended 100 pM loading concentration
NOTE(1): KLD buffer is quite nasty/toxic so EHS recommends double gloving and discarding all consumables that touch it in a special, designated waste bottle for later pickup.
NOTE(2): MiSeq i100 has a waste container on the right side that need emptying after every few runs, check before loading/running.
Once logging into instrument go to menu > settings > open side door
Empty contents of container into labeled, secondary waste container right next to instrument for EHS to pickup and discard
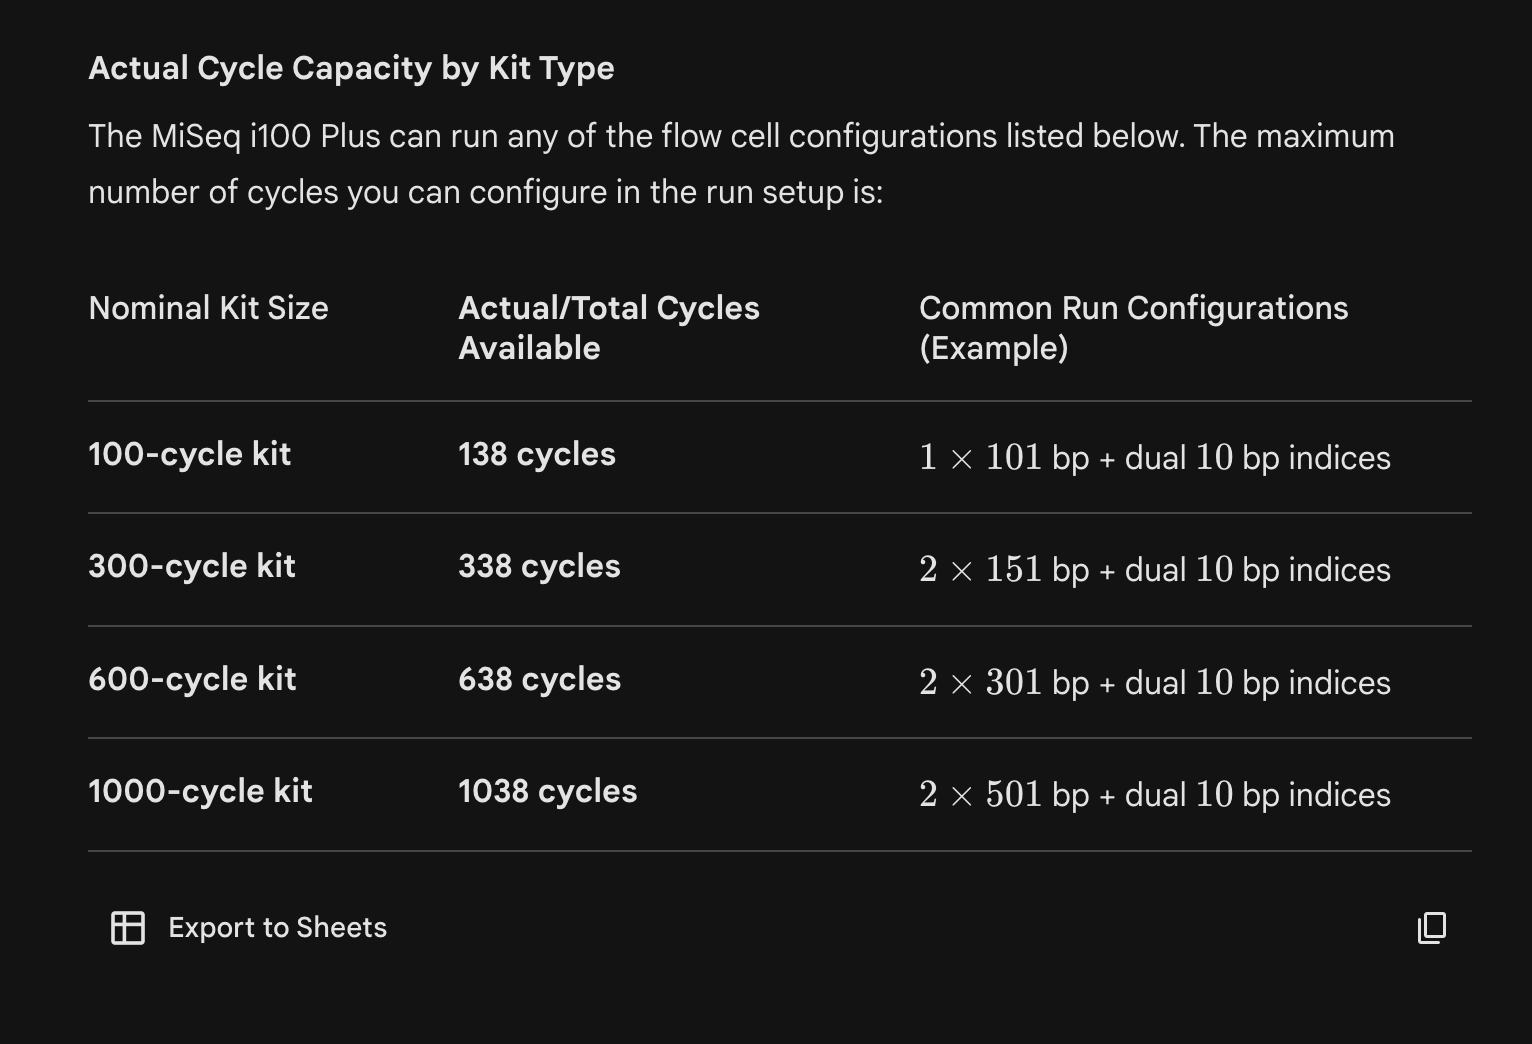
Sequencing note: Illumina kits contain extra reagents/cycles so you can “stretch” your runs. They don’t broadly advertise the true limits but Gemini estimates them here:
~40% extra capacity for the 100-cycle kits!! I think this is so 10X (scRNA-seq) libraries can be validated prior to full runs - a very helpful feature.